Imagine navigating a treacherous mountain trail, the sound of loose shale scraping against your Jeep’s undercarriage. For many Wrangler owners, that grinding noise is a signal of potential disaster—dented rocker panels, cracked paint, and costly body repairs. Rock rails are the single most effective upgrade you can make to protect your vehicle’s vulnerable lower body, transforming a weekend warrior into a trail-conquering machine. In 2026, with off-road trails becoming more technical and aftermarket parts more advanced, installing rock rails is no longer just an option; it is a necessity for anyone who takes their Wrangler off the pavement.
This comprehensive guide will walk you through every step of the rock rail installation process, from selecting the right set for your specific Wrangler model to torquing the final bolt. Whether you are a seasoned DIY mechanic or a first-time off-roader, you will learn the tools required, the common pitfalls to avoid, and the best practices for achieving a rock-solid, rattle-free installation. By the end of this article, you will have the confidence and knowledge to protect your investment and enhance your Wranglers off-road capability for years to come.
Understanding Rock Rails: Why They Matter for Your Wrangler
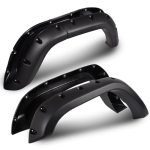
Rock rails, often called rock sliders, are heavy-duty metal bars that bolt directly to the frame or body mounts of your Jeep Wrangler. Unlike standard side steps, which are designed for easy entry and exit, rock rails are engineered to absorb the impact of boulders, logs, and uneven terrain. They act as a sacrificial barrier, deflecting obstacles away from the rocker panels—the stamped metal section between the and rear wheel wells. A direct hit to this area can easily cost thousands of dollars in bodywork, making rock rails a cost-effective policy for any serious off-ro.
The design of rock rails has evolved significantly by 2026. Modern options include frame-mounted systems that distribute force directly into the Jeep’s chassis, body-mounted rails that offer a lower profile, and hybrid designs that combine protection with a functional step. Materials range from high-strength steel, which offers maximum durability but adds weight, to aluminum, which is lighter and corrosion-resistant but may dent under extreme loads. Choosing the right material depends on your typical terrain: steel for rock crawling in Moab, aluminum for overlanding where fuel economy matters.
Beyond protection, rock rails serve a secondary purpose as a pivot point. When you slide your Wrangler over a large rock, the rail allows the vehicle to glide rather than catch. This reduces the risk of high-centering and can help you maintain momentum on tricky obstacles. Additionally, many 2026 models feature integrated mounting points for aftermarket accessories like air jacks or traction boards, adding versatility to an already essential component. Understanding these functions will help you appreciate why a proper installation is critical to maximizing their effectiveness.
Choosing the Right Rock Rails for Your Wrangler Model
Before you pick up a wrench, you must select rock rails that are specifically designed for your Wrangler’s generation. The JL (2018-2026), JT Gladiator (2020-2026), and JK (20072018) models all have different frame widths, body mount locations, and bolt patterns. Installing JK rails on a JL will result in misaligned holes and inadequate support. Always verify compatibility by checking the manufacturer’s specifications, including the year, model, and whether you have a two-door or four-door variant. For 2026, many brands offer model-specific kits that include all necessary hardware.
Consider your primary use case. If you are a hardcore rock crawler, look for rails that mount directly to the frame using at least six mounting points per side. These provide the strongest connection and can support the entire weight of the vehicle if you slide onto a boulder. For daily drivers who occasionally hit light trails, body-mounted rails are easier to install and often more affordable, but they offer less protection against severe impacts. A popular compromise in 2026 the “step slider” design, which combines a flat top surface for stepping with a reinforced lower tube for sliding.
Pay attention to the finish and warranty. Powder-coated rails resist rust and scratches better than painted options, but even the best coating will wear over time. Look for rails with a textured, UV-resistant finish that can handle sun exposure and trail debris. Many premium brands now offer a lifetime warranty against manufacturing defects and, in some cases, against bending or breaking during normal off-road use. Read reviews from other Wrangler owners in your region, as salt-belt winters can accelerate corrosion on cheaper steel rails. Your choice here directly impacts the longevity and performance of your installation.
Tools and Preparation: Setting Yourself Up for Success
A successful rock rail installation begins with proper preparation. You will need a basic set of hand tools: a socket set with metric and standard sizes (typically 13mm, 15mm, 18mm, and 21mm), a torque wrench capable of reading up to 150 ft-lbs, a breaker bar for stubborn bolts, and a set of Allen keys. Additionally, have a floor jack and jack stands on hand to lift the vehicle safely. For 2026 models, many rock rails require the removal of factory plastic rocker guards, which may involve prying off clips or drilling out rivets, so a trim removal tool and a drill with a metal bit are highly recommended.
Safety is paramount. Always work on a level surface and chock the wheels before lifting the vehicle. Wear safety glasses when drilling or cutting, and use gloves to protect against sharp metal edges. Before starting, spray all bolts you plan to remove with penetrating oil, especially if your Wrangler has seen winter road salt. Allow the oil to soak for at least 15 minutes to break up rust and corrosion. This simple step can save you from snapping a bolt, which would turn a one-hour job into a multi-day headache.
Organize your workspace. Lay out all the hardware from your rock rail kit and compare it to the instruction manual. Most kits include bolts, washers, lock washers, and sometimes spacers or brackets. Verify that you have the correct number of each component. If any pieces are missing, contact the manufacturer before proceeding. It is also wise to have a helper available for the final alignment and tightening, as rock rails can be heavy and awkward to hold in place while threading bolts. With everything ready, you can move to the installation phase with confidence.
Step By Step Installation: From Removal to Final Torque
Start by safely lifting your Wrangler. Use a floor jack at the designated frame points and place jack stands under the frame rails, not the axles, to ensure the suspension is fully unloaded. Remove the wheels if you need extra clearance, though this is not always necessary. Next, remove the factory rocker guards or side steps. On most JL and JT models, these are held on by a combination of bolts along the bottom edge and push-pin clips along the top. Carefully pry the clips out using a trim tool, then set the factory parts aside If you are installing on a JK, you may need to remove the plastic sill plates inside the door openings.
Now, position the new rock rail against the body. For frame-mounted systems, you will need to locate the threaded holes on the frame rail. These are often covered by plastic plugs or rubber grommets. Remove these and clean the threads with a wire brush. Align rock rail so that its mounting brackets sit flush against the frame. Start all bolts by hand to ensure they are not cross-threaded. Do not tighten anything yet. For body-mounted rails, the bolts will go into the body mount brackets, which are visible under the vehicle. Use the included spacers if necessary to achieve a level fit.
Once all bolts are started, tighten them in a crisscross pattern to ensure even pressure. Use your torque wrench to tighten each bolt to the manufacturer’s specification, typically between 30 and 50 ft-lbs for body mounts and 70 to 100 ft-lbs for frame mounts. Over-tightening can strip threads or warp the rail, while under-tightening can lead to rattles. After torquing, double-check every bolt. Reinstall the wheels if removed, lower the vehicle, and perform a final visual inspection. Open and close the doors to ensure the rails do not interfere with door swing. If everything clears, you are ready to hit the trail.
Post-Installation Checks and Long-Term Maintenance
After installation, take your Wrangler for a short test drive on pavement. Listen for any rattles, squeaks, or vibrations that indicate a loose bolt or improper fit. Drive over speed bumps and make sharp turns to simulate articulation. If you hear noise, re-check the torque on all bolts and inspect the contact points between the rail the body. Sometimes, a thin rubber gasket or a piece of adhesive foam can eliminate metal-on-metal contact. Many 2026 rock rail kits include anti-rattle tape for this exact purpose.
Long-term maintenance is straightforward but essential. After every off-road trip, wash the rock rails thoroughly to remove mud, salt, and debris that can trap moisture and cause rust. Inspect the powder coating for chips or scratches. Touch up any bare metal immediately with a matching paint or spray-on bed liner to prevent corrosion. Every six months, re-torque all bolts, as vibrations from off-roading can cause them to loosen over time. Pay special attention to the bolts near the body mounts, as these take the most stress.
Finally, consider upgrading your rock rails with additional accessories. Many 2026 models feature integrated slots for mounting hi-lift jacks, traction, or LED light pods. These additions can turn your rock rails into a multi-functional tool. However, be mindful of added weight and ensure your mounting system can handle the load. With proper care, a quality set of rock rails will outlast your Wrangler and can even be transferred to a future vehicle. They are an investment in both protection and peace of mind.
Key Takeaways
- ✓ Rock rails are essential for protecting your Wrangler’s rocker panels from costly damage during off-road driving.
- ✓ Always choose rails specifically designed for your Wrangler’s generation (JL, JK, JT) and your primary use case, whether rock crawling or overlanding.
- ✓ Proper preparation, including using penetrating oil and having the correct tools, prevents common installation headaches like snapped bolts.
- ✓ Torque all bolts to manufacturer specifications and use a crisscross pattern to ensure even pressure and prevent rattles.
- ✓ Perform regular maintenance, including washing after trips and re-torquing bolts every six months, to maximize the lifespan of your rock rails.
Frequently Asked Questions
Can I install rock rails on a stock-height Jeep Wrangler?
Yes, absolutely. Most rock rails are designed to fit stock-height Wranglers without any lift. However, you should check the ground clearance of the rail itself. Some frame-mounted rails hang lower than the factory rocker panels, which can reduce your breakover angle. Body-mounted rails typically offer better clearance for stock vehicles. Measure the lowest point of the rail before purchasing to ensure it does not become a liability on obstacles.
How long does a typical rock rail installation take?
For a first-time installer, expect the process to take between two and four hours. This includes lifting the vehicle, removing factory parts, aligning the new rails, and torquing all bolts. Experienced DIYers can complete the job in under an hour per side. The most time-consuming part is often removing stubborn factory clips or rusted bolts. Having a helper can cut the time, especially when aligning heavy steel rails.
Will rock rails affect my Wrangler’s resale value?
In most cases, rock rails increase resale value, especially if you are selling to an off-road enthusiast. They are seen as a desirable upgrade that indicates the vehicle was protected. However, if the rails are heavily scratched or rusted, they may detract from the appearance. Keep the original factory rocker guards in storage so you can reinstall them if a buyer prefers a stock look. A clean, well-maintained set of rock rails is a selling point, not a liability.
Do I need to drill any holes in my Wrangler to install rock rails?
It depends on the specific kit. Many frame-mounted rock rails for the JL and JT use existing threaded holes in the frame, requiring no drilling. Body-mounted rails often use existing body mount bolts. However, some budget-friendly or universal kits may require you to drill into the pinch weld or the rocker panel itself. Always read the product description carefully. For a no-drill installation, look for kits that explicitly state “bolt-on” or “no drilling required.”
Can I use rock rails as a jacking point?
Some high-end rock rails are designed to support the vehicle’s weight and can be used as jacking points, but this is not true for all models. Check the manufacturer’s specifications. If the rail is rated for jacking, it will typically have a flat, reinforced section and a weight rating printed on the product. Using a non-rated rail as a jacking point can bend the rail or damage the mounting brackets. Always use a proper frame jacking point unless the rail is explicitly certified for this purpose.
Conclusion
Installing rock rails on your Jeep Wrangler is one of the most rewarding and practical upgrades you can make. From protecting your vehicle’s body against costly damage to providing a stable step for entry and exit, the benefits are immediate and long-lasting. By following this step-by-step guide, you have learned how to choose the right rails, prepare your workspace, execute a precise installation, and maintain your investment for years of off-road adventures. The confidence that comes from knowing your rocker panels are shielded allows you to tackle more challenging trails without hesitation.
Now is the time to take action. Gather your tools, select a set of rock rails that matches your driving style, and commit to the installation this weekend. Do not let the fear of a few bolts and brackets keep you from protecting your Wrangler. The trail is calling, and with your new rock rails in place, you can answer with the assurance that your Jeep is ready for whatever lies ahead. Get out there, explore, and enjoy the peace of mind that comes with ultimate protection.

“Cars aren’t just machines. They’re freedom, memory, and a little bit of grease under your fingernails.”
I’m Theodore Roosevelt—though my friends just call me “Ted” (and no, I’m not related to the president, though I do share his love for adventure). I grew up in Detroit in the 1970s, back when the city was still the heart of the American auto industry. My first love was a rusted-out 1967 Mustang my father and I rebuilt in our garage when I was fifteen. That project taught me that cars have souls. After spending twenty years as a mechanic and another ten writing for magazines, I started this blog to help everyday drivers and weekend wrenchers feel confident under the hood. Whether you’re restoring a classic or just trying to keep your daily driver alive for one more winter, I’m here to help you get there.