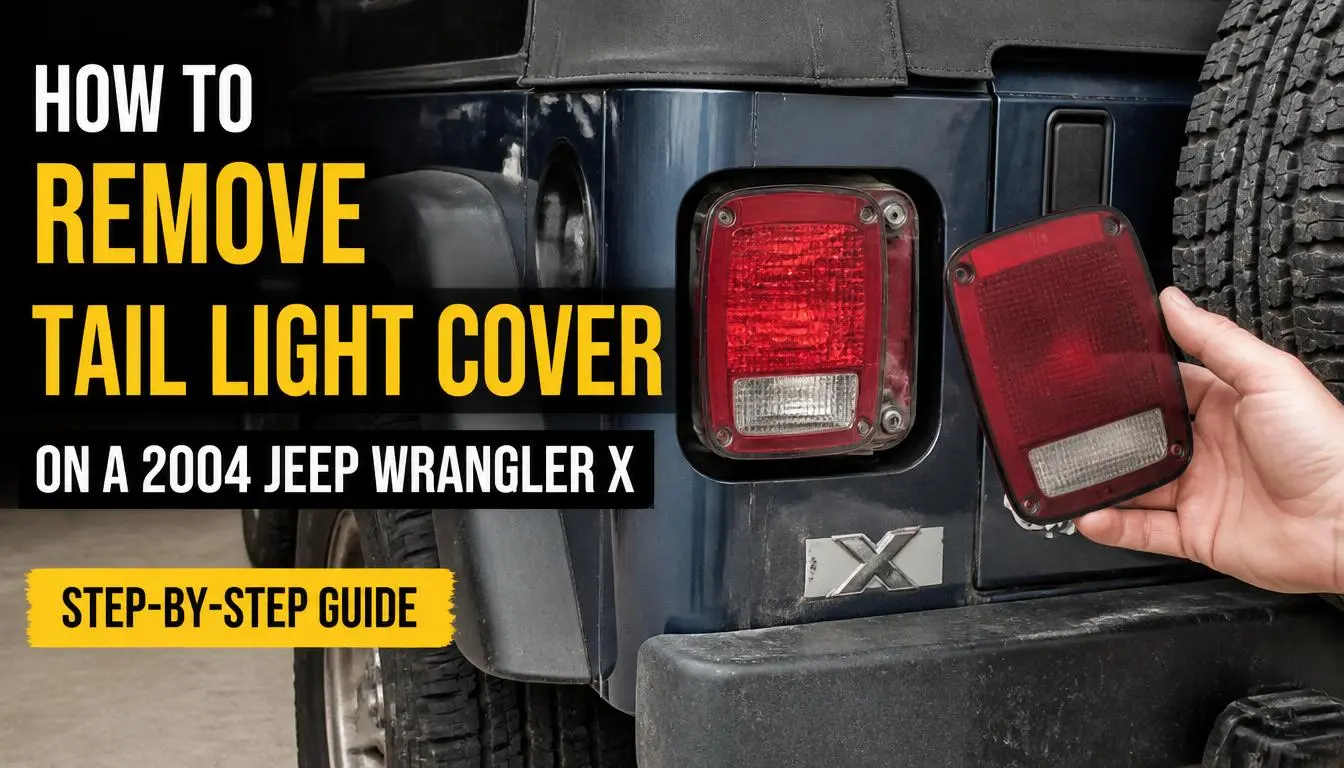
Removing the tail light cover on a 2004 Jeep Wrangler X is a simple job if your Jeep still has the factory-style TJ tail lights. In most cases, you only need a Phillips screwdriver to remove the outer lens or cover.
The important part is knowing the difference between the tail light cover, tail light housing, and complete tail light assembly. If you only need to change a bulb, clean the lens, or replace a damaged cover, you normally do not need to remove the entire assembly.
On the factory-style Jeep Wrangler TJ tail light, the outer lens is held in place by four Phillips screws. The complete housing is secured to the Jeep separately with three mounting bolts.
This guide explains how to remove the tail light cover safely, what to do if it is stuck, how to remove the complete assembly when necessary, and how to prevent water leaks after reinstalling it.
Quick Answer: How Do You Remove the Tail Light Cover on a 2004 Jeep Wrangler X?
To remove the tail light cover on a 2004 Jeep Wrangler X, park the Jeep, switch off the lights, and locate the four screws on the face of the tail light lens. Remove those screws with a Phillips screwdriver, support the lens with your other hand, and gently pull the cover straight away from the housing.
Do not force it. A rubber gasket sits behind the lens and may make an older cover feel stuck.
Factory-style 1998–2006 Wrangler TJ tail lights use this basic lens-removal arrangement.
If your Jeep has aftermarket LED lights or a custom housing, inspect the light before following these steps because the mounting method may be different.
What You Will Need
For a normal tail light cover removal, you will usually need:
- Phillips-head screwdriver
- Clean microfiber cloth
- Work gloves
- Small container for the screws
- Replacement lens or gasket if the original parts are damaged
If you plan to remove the entire housing, you may also need a 10 mm or similar appropriate socket and ratchet. Factory-style TJ housings are secured separately behind the lens.
Avoid using a large pry bar or metal screwdriver to force the plastic cover away from the housing. Plastic that has spent many years in sunlight can become brittle.
Tail Light Cover vs. Tail Light Assembly
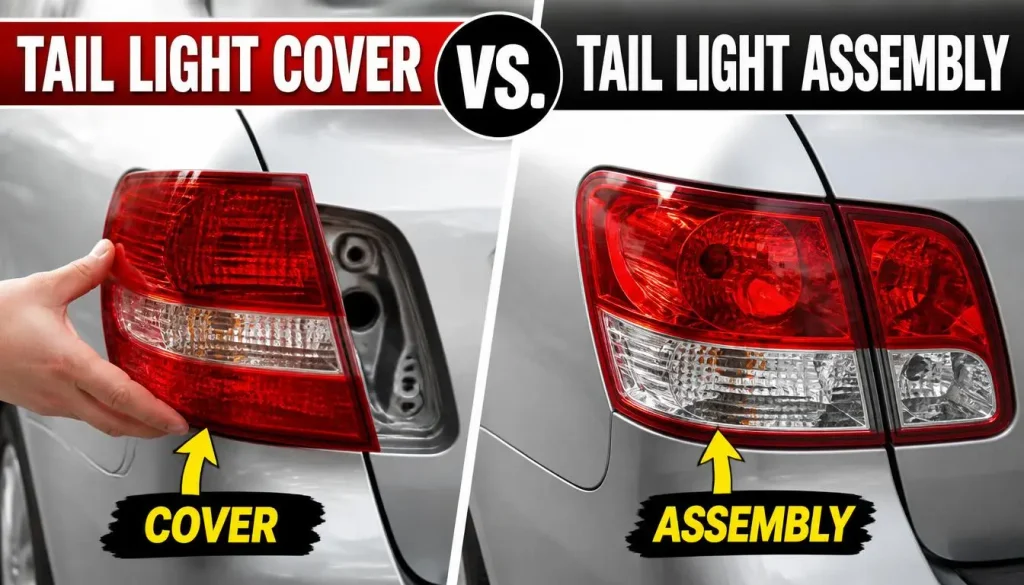
Before removing anything, identify the part you actually need to work on.
The tail light cover, often called the tail light lens, is the colored plastic piece you see from the outside of the Jeep.
The tail light housing is the main body behind the lens. It holds the bulbs, sockets, electrical connections, and mounting points.
The tail light assembly usually refers to the complete unit, including the housing and lens.
This difference matters because replacing a bulb or lens does not normally require removing the entire housing.
Is a 2004 Jeep Wrangler X a TJ?
Yes. The standard 2004 Jeep Wrangler belongs to the TJ generation, which covers the second-generation Wrangler platform. That is why parts, instructions, and replacement lights may be described as Jeep Wrangler TJ tail lights rather than specifically as “2004 Jeep Wrangler X” parts.
When shopping for a replacement lens or housing, however, always confirm the exact fit for your vehicle before ordering.
How to Remove the Tail Light Cover on a 2004 Jeep Wrangler X
Step 1: Park the Jeep Safely
Park on a level surface and engage the parking brake.
Turn the ignition off and make sure the headlights, parking lights, and hazard lights are switched off.
You normally do not need to disconnect the battery just to remove the plastic lens. If you are doing wiring repairs or modifying the electrical system, disconnecting the negative battery terminal may be appropriate.
Step 2: Inspect the Tail Light
Look closely at the tail light before touching the screws.
Check whether it appears to be the original rectangular TJ-style housing or an aftermarket replacement.
If you see a custom LED unit, flush-mounted light, or unfamiliar screw arrangement, do not assume the factory procedure applies.
Step 3: Locate the Four Lens Screws
On a factory-style Wrangler TJ tail light, four Phillips screws secure the lens to the housing.
Before removing them, clean dirt from the screw heads. Mud, rust, and old wax can prevent the screwdriver from seating correctly and increase the chance of stripping a screw.
Step 4: Remove the Screws
Use a Phillips screwdriver that fits the screw head firmly.
Apply steady pressure while turning counterclockwise.
Remove the screws one at a time. Keep them somewhere safe so they do not disappear under the Jeep.
If a screw feels tight, do not immediately apply excessive force. Old hardware can strip or break.
Step 5: Remove the Tail Light Lens
Once all four screws are out, hold the lens with both hands and gently pull it straight away from the housing.
Avoid twisting the lens aggressively.
There is a gasket behind the cover, and age, dirt, or moisture can cause it to stick to the housing. The gasket helps seal the lens and should not be damaged unnecessarily. The factory-style removal procedure specifically involves removing the lens while protecting the gasket underneath.
If the lens does not release easily, gently work around the edges with your fingers rather than forcing one corner.
Step 6: Inspect the Gasket and Housing
With the cover removed, inspect the seal around the housing.
Look for:
- Cracks
- Flattened or torn gasket material
- Dirt or mud
- Rust
- Moisture
- Corrosion around electrical components
Water inside a tail light can eventually damage bulb sockets and electrical connections, so a damaged seal should not be ignored. Cracks and failed seals are also common paths for moisture to enter an older housing.
How to Change the Tail Light Bulb While the Cover Is Off
If your reason for removing the cover is a burned-out rear bulb, the bulb area is now accessible.
Allow the bulb to cool before touching it.
Remove the appropriate bulb from its socket according to the socket design, then compare the replacement with the original before installing it.
Because replacement listings may vary by market, lamp configuration, and manufacturer, confirm the correct bulb for your specific Wrangler using the existing bulb, your vehicle information, or Jeep/Mopar documentation rather than relying only on a generic online listing.
Mopar provides vehicle-specific owner resources and manuals that can be selected by vehicle.
After fitting the bulb, test the light before reinstalling everything.
Check the running light, brake light, turn signal, and any other function associated with the rear lamp. A 2004 Wrangler may have more than one lighting function within the rear lamp cluster.
How to Remove the Complete Tail Light Assembly
You do not need to complete this section if you only wanted to remove the tail light cover.
Remove the complete housing if it is cracked, badly corroded, damaged in an accident, or being replaced with another assembly.
Remove the Lens First
Follow the earlier steps and remove the four Phillips screws and outer lens.
Locate the Housing Mounting Bolts
Behind the lens, the factory-style housing is secured to the Jeep with three mounting bolts. A 10 mm or equivalent suitable socket is commonly used for the factory-style assembly.
Remove the Mounting Bolts
Support the housing while loosening the bolts.
Do not allow the housing to drop or hang from the wiring after the last bolt is removed.
Pull the Housing Away From the Body
Move the housing outward carefully.
Do not pull hard because the electrical connector remains attached behind it.
Disconnect the Wiring
Locate the electrical connector and release its locking tab before separating the plug.
If dirt has collected around the connector, clean the area before reconnecting it.
When installing the housing again, avoid overtightening the mounting hardware because excessive force can damage an older plastic housing.
What If the Tail Light Cover Will Not Come Off?
A cover that has been installed for years may not separate immediately after the screws are removed.
First, make sure you removed all four lens screws.
Then try gently moving the lens from side to side while pulling outward evenly.
The most common reasons for a stuck lens include an old gasket sticking to the plastic, accumulated dirt, corrosion around the hardware, or previous repairs involving adhesive or sealant.
Do not jam a large screwdriver behind the lens. It is easy to chip or crack the plastic.
If someone previously sealed the lens with silicone or another adhesive, removal may require considerably more care than the factory procedure.
What to Do If a Tail Light Screw Is Stuck or Stripped
A rusty screw can turn an easy repair into a frustrating one.
Start by cleaning the screw head thoroughly. Use the correct-size screwdriver and push firmly into the head while turning slowly.
If the screw begins to strip, stop before the head becomes completely rounded.
A small amount of suitable penetrating lubricant around metal hardware may help with corrosion, but keep chemicals away from electrical components and painted surfaces unless the product is safe for them.
For badly stripped or broken fasteners, it may be better to use a proper extraction tool rather than damaging the housing.
Should You Replace the Tail Light Gasket?
Not every lens removal requires a new gasket.
You can normally reuse the existing gasket if it is flexible, complete, clean, and undamaged.
Consider replacing it if it is torn, badly flattened, brittle, missing sections, or no longer seals against the lens.
A damaged gasket can allow moisture into the housing. Signs of water intrusion include condensation, water droplets, corrosion, mineral marks, or repeated bulb problems.
How to Reinstall the Tail Light Cover
Before putting the cover back on, wipe dust and dirt from the housing and lens sealing surfaces.
Position the gasket correctly.
Place the lens over the housing and make sure it sits flat rather than being pinched on one side.
Install the four screws by hand first.
Tighten them gradually and evenly.
The screws only need to hold the plastic lens securely against the seal. Overtightening them can stress or crack old plastic.
Once the lens is secure, test the lights again.
How to Prevent Water Inside the Tail Light
If you found condensation while removing the tail light lens, find the cause before simply putting the cover back on.
Inspect the lens for cracks and check the gasket around the entire perimeter.
Also inspect the housing and electrical connector for signs of previous water entry. Water intrusion can leave corrosion or deposits inside the assembly.
Do not assume that adding a thick layer of sealant around the outside is always the correct solution. A damaged lens, distorted housing, or failed gasket should be repaired properly.
Factory vs. Aftermarket LED Tail Lights
Many older Wranglers have been modified, so a 2004 Jeep Wrangler X may no longer have its original tail lights.
Factory-style TJ lamps use the lens-and-housing arrangement described above.
Aftermarket LED lights may use different brackets, wiring connectors, mounting bolts, seals, or integrated lenses.
Some LED assemblies do not have a separately removable front cover at all.
Before pulling on an aftermarket lamp, identify its mounting system. If possible, check the instructions supplied by the light manufacturer.
This prevents broken brackets, damaged wiring, and unnecessary body damage.
Should You Replace Just the Cover or the Whole Assembly?
Replace only the tail light cover when the housing and electrical parts remain in good condition and the problem is limited to a cracked, faded, or damaged lens.
Replacing the complete assembly makes more sense when the housing is cracked, mounting points are broken, sockets are badly corroded, or water damage has affected several internal parts.
Inspect the electrical connector at the same time. Green or white deposits on connector pins can indicate corrosion caused by moisture.
Common Mistakes to Avoid
The job is simple, but small mistakes can create bigger problems.
Do not force the lens after removing only some of the screws. Do not overtighten screws during installation. Do not ignore a damaged gasket. Do not allow the complete housing to hang by its wiring. And do not assume aftermarket lights use the same removal procedure as the original Jeep assembly.
It is also worth testing every rear lighting function before finishing. Finding a problem while the lens is already off is much easier than removing everything again.
Frequently Asked Questions About How to Remove Tail Light Cover on a 2004 Jeep Wrangler X
Can You Remove Just the Tail Light Lens on a 2004 Jeep Wrangler X?
Yes. On the factory-style Wrangler TJ tail light, the outer lens is secured separately with four Phillips screws, so the lens can be removed without taking the complete housing off the Jeep.
Do I Need to Remove the Entire Tail Light to Change a Bulb?
Normally, no. If your 2004 Wrangler still has the factory-style light, removing the outer lens provides access to the lamp area. Complete housing removal is generally unnecessary for a basic bulb replacement.
How Many Screws Hold the Tail Light Cover?
The factory-style Jeep Wrangler TJ lens uses four Phillips screws on the front of the lens.
How Many Bolts Hold the Complete Tail Light Housing?
The factory-style housing is secured to the body with three mounting bolts behind the lens.
Why Is My Jeep Wrangler Tail Light Full of Water?
Common causes include a cracked lens, damaged gasket, damaged housing, or a failed seal. Inspect both the lens and housing rather than only drying the moisture.
Can I Replace Only a Cracked Tail Light Cover?
Yes, if a compatible replacement lens is available and the housing, gasket, bulb sockets, and mounting points remain in good condition. Replacement lenses are sold for Wrangler TJ applications, but you should confirm year and vehicle fitment before buying.
Are Jeep Wrangler TJ and 2004 Jeep Wrangler X Tail Lights the Same Thing?
“X” identifies a Wrangler trim, while “TJ” refers to the vehicle generation/platform. Therefore, you will often see replacement parts described as fitting a Jeep Wrangler TJ rather than specifically using the X trim name.
Always verify the exact year, side, lamp type, and fitment before purchasing.
What If My Wrangler Has LED Tail Lights?
Do not automatically follow the factory lens-removal procedure. Aftermarket LED assemblies can have different mounting and wiring systems, and some do not use a removable lens.
Final Check
Removing the tail light cover on a 2004 Jeep Wrangler X should be a straightforward DIY job when the Jeep has factory-style TJ tail lights.
For the lens alone, the basic process is simple: switch the lights off, remove the four Phillips screws, gently separate the lens from the housing, inspect the gasket, complete the repair, and reinstall the cover evenly. The complete housing only needs to come off when you are replacing or repairing the entire tail light assembly.
Take your time with the old plastic and hardware. A few extra minutes spent cleaning the screws, checking the gasket, and testing the lights can prevent cracked lenses, water leaks, and having to repeat the job later.
“Cars aren’t just machines. They’re freedom, memory, and a little bit of grease under your fingernails.”
I’m Theodore Roosevelt—though my friends just call me “Ted” (and no, I’m not related to the president, though I do share his love for adventure). I grew up in Detroit in the 1970s, back when the city was still the heart of the American auto industry. My first love was a rusted-out 1967 Mustang my father and I rebuilt in our garage when I was fifteen. That project taught me that cars have souls. After spending twenty years as a mechanic and another ten writing for magazines, I started this blog to help everyday drivers and weekend wrenchers feel confident under the hood. Whether you’re restoring a classic or just trying to keep your daily driver alive for one more winter, I’m here to help you get there.