A Jeep Wrangler JK body lift is one of the cheapest ways to create extra tire clearance without changing the suspension. If your tires rub the fenders, your Jeep looks too low after bigger wheels, or you want a simple weekend upgrade, a body lift can help. Most JK owners choose a 1-inch to 1.25-inch body lift because it keeps the Jeep close to stock while making room for larger tires. A 2-inch body lift can work too, but it needs more careful checking around the steering shaft, bumpers, body gaps, and inner fenders.
This guide explains how a body lift works, which Jeep JK models it fits, how much it costs, which kits are worth looking at, and how to install one safely. It is written for 2007–2018 Jeep Wrangler JK and JKU owners who want a clear, practical, DIY-friendly guide before buying parts or booking a shop.
What Is a Body Lift Kit? Body Lift vs Suspension Lift Explained
A body lift kit raises the body of your Jeep away from the frame using pucks, blocks, or replacement body mounts. The frame, axles, shocks, control arms, steering geometry, and suspension height stay mostly unchanged. This is the main difference between a body lift and a suspension lift.
A suspension lift raises the Jeep by changing suspension parts. It can add more ground clearance under the frame, improve off-road articulation, and allow larger tires when paired with the right parts. A body lift only raises the body. It does not move the axles lower. It does not increase clearance under the differential. It mainly creates more space between the tires and body panels.
That makes a body lift useful for one simple reason: tire clearance. If your 33-inch or 35-inch tires rub the fender flares, pinch seams, or inner liners, a small body lift can give you extra room without the cost of a full suspension setup.
Here is the simple comparison:
| Feature | Body Lift | Suspension Lift |
|---|---|---|
| Raises body | Yes | Yes, indirectly |
| Raises frame | No | Yes |
| Changes suspension geometry | No | Yes |
| Improves axle ground clearance | No | No, tire size does that |
| Helps tire clearance | Yes | Yes |
| Usually needs alignment | No | Yes |
| Cost | Lower | Higher |
| Install difficulty | Easier | Medium to advanced |
| Ride quality change | Usually none | Depends on kit |
A body lift is best when you want a small height change, more tire clearance, and a lower-cost install. A suspension lift is better when you want better off-road performance, more travel, and a taller stance.
Many Jeep JK owners combine both. For example, a 2.5-inch or 3-inch suspension lift with a 1-inch or 1.25-inch body lift can help fit larger tires while keeping the suspension lift moderate. This combo is common for owners who want 35-inch or 37-inch tires but do not want an extreme suspension setup.
The smart rule is simple: use a small body lift for clearance, not as a replacement for a complete suspension build.
Will a Body Lift Fit My JK? Year, Model, and Transmission Check
Most Jeep Wrangler JK body lift kits are made for 2007–2018 Jeep Wrangler JK models. This includes both the 2-door Wrangler JK and the 4-door Wrangler Unlimited JKU. Still, you should never order a kit based only on the word “JK.” Always check your year, door count, transmission type, and kit notes before buying.
The 2-door JK usually has fewer body mounts than the 4-door Unlimited. Many guides mention 10 mounts for a 2-door and 12 mounts for a 4-door. That matters because the hardware count can vary by kit. A kit that fits a 4-door Unlimited may include more hardware than needed for a 2-door, while some kits are sold for a specific model only.
Year details also matter. Some early JK models use different rear bolt sizes than later models. A common ordering note is that some 2007 JKs use 12mm rear bolts, while many later models use 14mm hardware. Before ordering, confirm your Jeep’s year and compare the kit’s fitment notes carefully.
Transmission type is another important point. Automatic JK owners usually have fewer shifter issues with small body lifts. Manual transmission JK owners may need to trim the inner shift boot or install a shifter relocation adapter. Without this fix, the shifter can feel tight or hard to engage in certain gears, especially 2nd, 4th, 6th, or reverse.
Before buying a Jeep JK body lift kit, check these details:
| Fitment Point | What to Check |
|---|---|
| Model year | 2007–2018 JK / JKU |
| Door count | 2-door or 4-door Unlimited |
| Drive type | 2WD or 4WD, depending on kit |
| Transmission | Manual or automatic |
| Lift height | 1-inch, 1.25-inch, or 2-inch |
| Hardware | Correct bolt size and body mount count |
| Bumper brackets | Included or sold separately |
| Shifter adapter | Needed for many manual setups |
| Gap guards | Helpful on taller body lifts |
If your Jeep has rust, previous frame repairs, aftermarket bumpers, rock sliders, or body armor, check those parts before starting. A body lift may create small visual gaps around bumpers and sliders, and some aftermarket parts may need adjustment after the body moves upward.
DIY vs Professional Install: Which Should You Choose?
A Jeep JK body lift is one of the more DIY-friendly Jeep upgrades, especially when the lift height is 1 inch or 1.25 inches. Most owners with basic tools, a floor jack, jack stands, a torque wrench, and patience can handle the job at home.
The biggest benefit of DIY installation is cost. A basic body lift kit may cost around $100 to $300, depending on the brand, height, and included parts. If you already own the tools, your total cost may stay close to the kit price. If you need to buy tools, penetrating oil, thread locker, and a torque wrench, your total cost will be higher.
A professional shop install usually costs more because you pay for labor. Labor can vary widely by area, shop rate, rust condition, lift height, and whether extra parts need adjustment. A basic 1.25-inch body lift may be a short job for an experienced mechanic. A 2-inch body lift with steering extension, bumper adjustment, and gap guards can take longer.
Here is a realistic cost breakdown:
| Install Type | Expected Cost |
|---|---|
| Basic DIY kit only | $100–$300 |
| DIY with extra tools and supplies | $150–$400 |
| Shop labor only | $200–$500 |
| Kit plus shop labor | $500–$1,000+ |
| More complex 2-inch install | Often higher |
One big money-saving advantage is that a body lift usually does not require a wheel alignment. A suspension lift changes suspension geometry. A body lift does not. Since the axles, control arms, steering linkages, and suspension angles are not changed in the same way, alignment is not normally needed after a simple body lift.
DIY is a good choice if your Jeep is clean underneath, the bolts are not badly rusted, and you feel comfortable lifting the body slightly from the frame. A shop is the better choice if your Jeep has heavy rust, seized bolts, aftermarket armor, manual transmission complications, or you do not have a safe work area.
Do not install a body lift on soft ground, a sloped driveway, or without proper support. A floor jack alone is not enough for safety. Use jack stands, work slowly, and never place your body under an unsupported load.
Top Jeep Wrangler JK Body Lift Kits Reviewed and Ranked
There are many Jeep JK body lift kits on the market, but a few brands come up again and again because of price, fitment, hardware, and long-term user feedback. The best kit depends on your budget, lift height, transmission, and how complete you want the package to be.
Rough Country 1.25-Inch Body Lift Kit
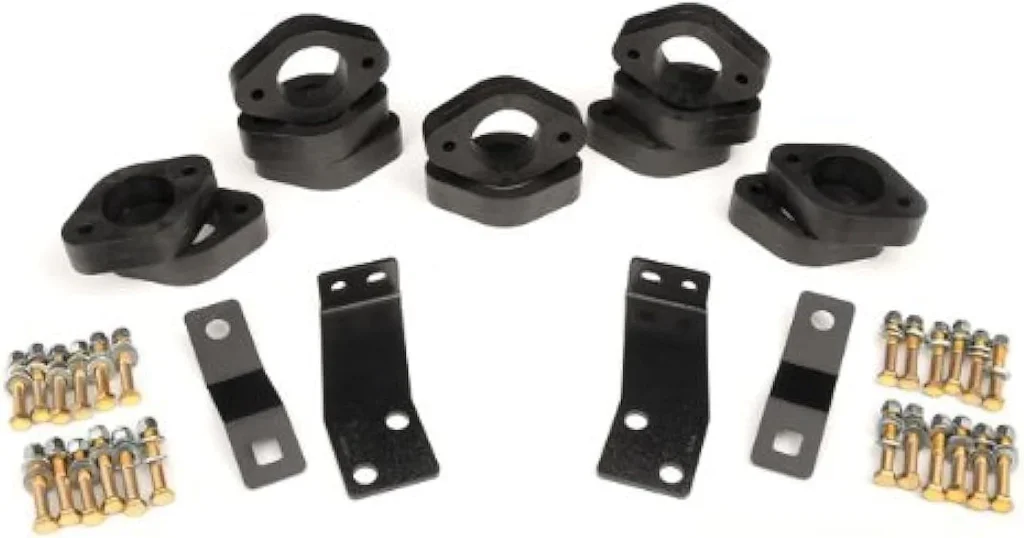
The Rough Country 1.25-inch body lift is one of the most popular budget-friendly options for Jeep Wrangler JK owners. It gives slightly more lift than a standard 1-inch kit, which helps with tire clearance while keeping the visual gap manageable.
This kit is attractive because it usually includes useful parts such as body lift pucks, hardware, and rear bumper brackets. The bumper brackets are important because body lifts can create an unwanted bumper gap. A kit that includes brackets saves you from buying extra parts later.
This is a good choice for owners who want a simple, affordable lift for a daily-driven JK or JKU. It is not the most premium option, but it offers strong value for the price.
Best for: Budget buyers, basic tire clearance, weekend DIY installs.
Watch out for: Always confirm fitment for your exact year, door count, and transmission.
TeraFlex 1.25-Inch Body Lift Kit
Credit: Amazon
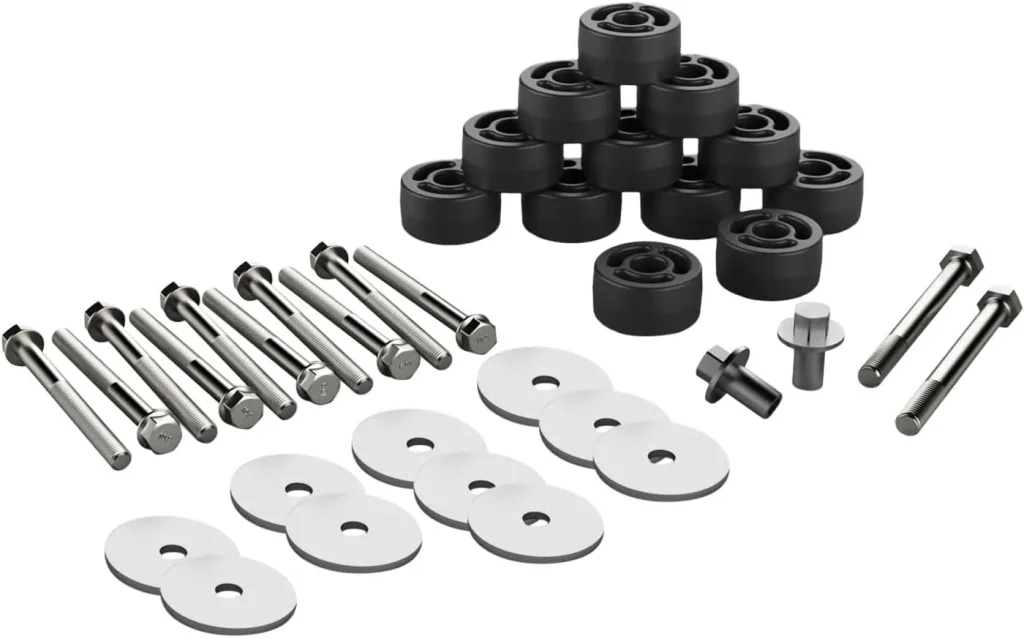
The TeraFlex 1.25-inch body lift is often seen as a more premium option. TeraFlex has a strong reputation in the Jeep market, and many owners choose it when they want better long-term confidence.
A 1.25-inch height is a smart size for the JK. It gives more clearance than a 1-inch lift but avoids many of the extra complications of a 2-inch body lift. For many Jeep owners, this is the sweet spot.
TeraFlex-style kits are especially appealing if you want a cleaner, more reliable setup and are willing to pay a little more. The installation is still manageable for a DIY owner, but proper torque and rechecking are important.
Best for: Owners who want quality, clean fitment, and long-term peace of mind.
Watch out for: Premium kits may cost more than budget options.
M.O.R.E. 1-Inch Body Lift
Credit: Amazon
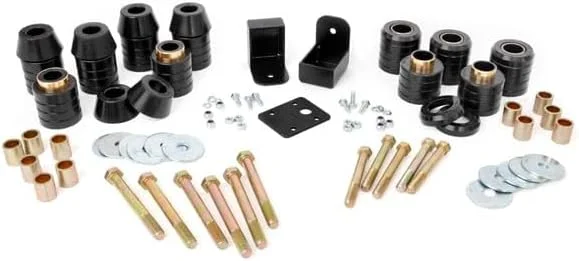
M.O.R.E. is known for practical Jeep parts, and its body lift options are popular with owners who want a clean and functional setup. Some M.O.R.E. body lift kits replace factory body mounts rather than simply stacking pucks above old mounts.
That can be a major benefit on older JKs where factory rubber mounts are worn, cracked, or compressed. Replacing the mounts can refresh the connection between body and frame while adding lift.
A 1-inch lift is also conservative. It gives useful tire clearance while keeping bumper gaps, steering concerns, and visual changes smaller.
Best for: Older JKs with worn body mounts and owners who want a clean upgrade.
Watch out for: Replacement-style kits may take more time than simple puck kits.
Performance Accessories 2-Inch Body Lift
A 2-inch body lift gives more body clearance than 1-inch or 1.25-inch kits, but it also adds more complexity. Performance Accessories PA994-style kits are commonly discussed for JK owners who want a taller body lift while keeping suspension geometry unchanged.
A 2-inch lift can make bumper gaps, wheel well gaps, steering shaft concerns, ground strap issues, and body-to-frame spacing more noticeable. For that reason, a 2-inch kit should be treated as a more involved install, not just a taller version of a simple puck kit.
This type of kit is better for owners who understand the trade-offs and want a more complete setup. Gap guards may be needed to clean up the open space inside the wheel wells.
Best for: Owners who want more body clearance and are comfortable with extra adjustments.
Watch out for: Check steering extension, transmission fitment, bumper gaps, and local rules.
Daystar 1-Inch Body Lift
Daystar is another recognized name in body mounts and polyurethane lift components. A Daystar-style 1-inch body lift can be a good choice for owners who want a modest height increase with replacement-style mounts.
The key advantage is simplicity. A 1-inch lift usually creates fewer issues than taller body lifts. It is enough to help with tire clearance while keeping the Jeep’s appearance close to factory.
Best for: Conservative lift height, daily drivers, clean OEM-like look.
Watch out for: Confirm that the kit is made for your exact JK model and year.
Budget vs Premium Body Lift Kit Comparison
| Kit | Lift Height | Best Use | Main Benefit | Possible Concern |
|---|---|---|---|---|
| Rough Country | 1.25 in | Budget tire clearance | Affordable and popular | Check fitment details |
| TeraFlex | 1.25 in | Premium DIY setup | Strong reputation | Higher price |
| M.O.R.E. | 1 in | Body mount refresh | Clean replacement style | May take longer |
| Performance Accessories | 2 in | Taller body clearance | More height | More adjustments |
| Daystar | 1 in | Conservative upgrade | Polyurethane mount design | Availability varies |
For most Jeep JK owners, the best all-around choice is a 1-inch or 1.25-inch body lift. It gives enough room for common tire upgrades without creating too many extra problems. A 2-inch body lift should be used only when you understand the extra checks involved.
Tools and Materials You Need Before You Start
Do not start the install until all tools and supplies are ready. Stopping halfway because you are missing a torque wrench, socket, or thread locker can turn an easy job into a frustrating one.
Here is a practical tool list:
| Tool or Material | Why You Need It |
|---|---|
| Floor jack | To raise the body slightly |
| Jack stands | To support the Jeep safely |
| 2×4 wood block | To spread jack pressure under the body |
| Socket set | For body mount bolts and brackets |
| 16mm, 18mm, 19mm sockets | Common sizes for JK body lift work |
| Torque wrench | To tighten bolts to spec |
| Penetrating oil | Helps loosen old or rusty bolts |
| Thread locker | Helps keep body bolts secure |
| Screwdrivers | For grille clips and small trim parts |
| Trim tool | Helpful for plastic clips |
| Razor blade | For manual shift boot trimming |
| Bench vise or wood blocks | Helps remove old retaining washers |
| Gloves and safety glasses | Basic protection |
Spray penetrating oil on body mount bolts before the install, especially if your JK is older or has seen salted roads. Rusted bolts are one of the most common reasons a simple body lift takes longer than expected.
If you are installing a 2-inch body lift, check whether your kit includes a steering shaft extension, ground strap brackets, bumper relocation parts, and gap guard options. Taller body lifts need more attention than small lifts.
Also, read the kit instructions before loosening the first bolt. Different brands may have different steps, hardware notes, and torque values.
Step-by-Step Body Lift Installation Guide for Jeep JK
This section gives a general Jeep JK body lift installation process. Always follow your specific kit instructions because parts and torque values may vary.
Step 1: Park on Level Ground
Park the Jeep on a flat, solid surface. Engage the parking brake. Block the tires so the Jeep cannot roll. Keep the transmission in park for automatic models or in gear for manual models.
Do not install a body lift on gravel, grass, soft soil, or a steep driveway. The body needs to stay stable while being raised.
Step 2: Inspect the Jeep Before Lifting
Look under the Jeep and inspect the body mounts, bumpers, rock sliders, side steps, wiring, brake lines, fuel filler area, ground straps, and steering shaft area. Make sure nothing is already damaged or stretched.
If the Jeep has aftermarket bumpers or sliders, check how they attach. Frame-mounted parts may not move with the body. Body-mounted parts will move upward. This is why gaps can appear after a body lift.
Step 3: Remove the Front Grille if Needed
Some installs require removing the front grille or loosening front components for access. Many JK grilles are held with plastic clips along the top. Remove the clips carefully so they do not break. Disconnect the parking light wiring if needed.
Keep all clips, screws, and small parts in a tray so nothing gets lost.
Step 4: Loosen the Body Mount Bolts on One Side
Work one side at a time. Loosen the body mount bolts on the right side, but do not fully remove all bolts at once. The bolts on the opposite side help keep the body aligned while one side is raised.
This is one of the most important safety steps. Do not lift both sides of the body at the same time. Raise only enough to slide the pucks or mounts into position.
Step 5: Position the Floor Jack Correctly
Place the floor jack under a strong body support area, not under weak sheet metal. Use a 2×4 wood block between the jack and body to spread the load. Raise slowly.
You only need enough space to remove the old bolt and insert the body lift puck or replacement mount. Lifting too high can stress wiring, hoses, filler necks, and other connections.
Step 6: Install the Body Lift Pucks or Mounts
Slide the new puck or replacement mount into position according to the kit instructions. Make sure it sits flat and centered. If it is crooked, lower the body and reposition it before installing the bolt.
Install the new longer bolt loosely by hand. Do not fully tighten yet. Finger-tight is enough while the rest of the mounts are being installed.
Step 7: Transfer Retaining Washers if Required
Some kits require transferring factory washers from old bolts to new bolts. This can be annoying because the washers may be held tightly. A bench vise makes the job easier. If you do not have one, two small wood blocks may help.
Do not skip washer transfer if your kit requires it. Missing washers can affect bolt seating and long-term security.
Step 8: Repeat for the Other Mounts on the Same Side
Move slowly from mount to mount. Install each puck or replacement mount, add thread locker if instructed, and start each bolt by hand. Keep everything loose until all mounts are in position.
Watch the body as you work. If it shifts, stop and correct it before moving forward.
Step 9: Lower the Body Onto the New Mounts
Once the pucks or mounts are installed on the first side, slowly lower the body back down. Make sure the body settles evenly onto the new parts. Do not force bolts into place with an impact gun if the holes are not aligned.
If a bolt does not start smoothly by hand, alignment may be off. Adjust the body position slightly and try again.
Step 10: Repeat the Same Process on the Other Side
Move to the other side of the Jeep. Loosen the body mount bolts, raise the body slightly, install the pucks or mounts, start the bolts by hand, and lower the body carefully.
Again, do not lift higher than needed. The goal is to create just enough space to install the lift components.
Step 11: Torque the Body Mount Bolts
After both sides are installed and the body is sitting properly, torque the bolts according to your kit instructions. Many JK body lift instructions use around 80 ft-lbs for body mount bolts, but you should always follow the values supplied with your specific kit.
Do not guess torque by feel. Body mount bolts need to be tight enough to stay secure but not so tight that parts are damaged.
Step 12: Reinstall the Grille and Wiring
Reconnect any wiring that was unplugged. Reinstall the grille clips and check that the grille sits properly. Make sure parking lights and indicators work before driving.
Step 13: Fix Manual Transmission Shifter Issues
If your JK has a manual transmission, test the shifter before driving. Move through every gear with the Jeep safely parked. If the shifter binds or feels blocked, you may need to trim the inner shift boot or install a shifter adapter.
Do not ignore hard shifting. A body lift can change the relationship between the body, boot, console, and shifter.
Step 14: Final Safety Check
Before driving, check all body mount bolts, bumper brackets, steering movement, wiring, brake lines, fuel filler area, and any aftermarket accessories. Turn the steering wheel lock-to-lock and listen for rubbing or binding.
Take a short test drive at low speed. Listen for clunks, squeaks, or movement. After 100–200 miles, re-torque the body mount bolts and inspect everything again.
After the Install: Gaps, Checks, and Adjustments
A body lift is simple, but the post-install checks are important. Many issues are not mechanical failures. They are small fitment details that become visible after the body sits higher than before.
Bumper Gap
The most common visual issue is a bumper gap. Since many bumpers mount to the frame, and the body moves upward, the bumper may sit lower compared to the body. This can create an open space at the front or rear.
Some kits include bumper relocation brackets to reduce or hide this gap. If your kit does not include them, you may need to buy brackets separately or accept the visual gap.
Rock Sliders and Side Steps
Rock sliders and side steps can also look different after a body lift. Frame-mounted sliders stay with the frame, while the body rises. This can create a small gap between the rocker panel and slider.
This gap is usually cosmetic. It does not always mean the slider is unsafe. Still, check bolt clearance and door operation after the install.
Wheel Well Gap
A 1-inch or 1.25-inch lift usually creates a mild gap. A 2-inch body lift can make the gap more visible inside the wheel wells. Gap guards or inner fender extensions can help hide the open space and reduce dirt splash.
Steering Clearance
Turn the steering wheel from lock to lock while parked. Check for rubbing, binding, or unusual movement around the steering shaft. This is especially important with taller body lifts.
Brake Lines and Wiring
A small body lift usually does not stretch brake lines because the suspension and axles stay in place. Still, inspect all visible lines and wiring. Look near the engine bay, frame, rear body area, fuel filler, and lights.
Alignment
A body lift does not normally require alignment because it does not change suspension geometry. If your Jeep drove straight before the body lift, it should still drive straight after the install. If it pulls, wanders, or feels unstable, another issue may be present and should be inspected.
Common Mistakes to Avoid When Installing a JK Body Lift
A body lift is not hard, but small mistakes can create noise, poor fitment, or safety concerns. Avoid these common problems.
Removing Too Many Bolts at Once
Do not remove all body mount bolts from both sides at the same time. Work one side at a time and keep the opposite side loosely connected. This helps keep the body aligned.
Lifting the Body Too High
You only need enough space to slide in the pucks or mounts. Lifting too high can stress wires, hoses, filler necks, and other connections.
Skipping Thread Locker
Many body lift kits recommend thread locker on body mount bolts. Skipping it can allow bolts to loosen over time, especially on a Jeep that sees trail use.
Forgetting Washer Transfer
If the new bolts require factory washers, transfer them carefully. Do not throw away old bolts until the install is fully finished and inspected.
Using the Wrong Torque
Do not tighten bolts by guessing. Use a torque wrench and follow the kit instructions. Incorrect torque can cause loose mounts, damaged hardware, or annoying clunks.
Ignoring Manual Transmission Fitment
Manual JK owners must check shifter movement carefully. If the boot binds, trim it or use the correct adapter. Do not force the shifter.
Skipping the Re-Torque
Re-torque the bolts after 100–200 miles. This is a simple step, but it matters. New parts can settle after the first few drives.
Not Checking Bumper and Slider Gaps
After the body moves upward, frame-mounted parts may no longer line up visually. Check bumpers, sliders, steps, and armor before assuming the job is finished.
Installing on Uneven Ground
A body lift should be installed on flat, solid ground. Uneven ground can let the body shift while lifted, making alignment harder and increasing risk.
FAQs on Jeep Wrangler JK Body Lift Install Guide
How much does a JK body lift cost?
A basic Jeep JK body lift kit usually costs around $100 to $300. DIY installation may keep your total cost under $300 if you already own the tools. A shop install can add around $200 to $500 or more in labor, depending on your area and Jeep condition.
How long does a body lift installation take?
A simple 1-inch or 1.25-inch body lift may take around 1–3 hours for someone with tools and experience. A first-time DIY install may take longer. A 2-inch kit or a Jeep with rusted bolts can take several hours.
Do I need an alignment after a body lift?
No, a body lift does not normally require wheel alignment. It does not change control arms, track bars, axle position, caster, camber, or toe. Alignment is usually needed after suspension lifts, not simple body lifts.
Can I combine a body lift with a suspension lift?
Yes. Many JK owners combine a small body lift with a suspension lift. For example, a 2.5-inch or 3-inch suspension lift plus a 1-inch or 1.25-inch body lift can create more tire clearance without going too extreme on suspension height.
Will a body lift void my Jeep warranty?
A body lift does not automatically void an entire vehicle warranty in the United States. Under general warranty rules, a manufacturer or dealer usually needs a valid reason to deny a specific claim. However, if the lift causes or contributes to a problem, that related repair may be denied. Always keep records, use quality parts, and check your local consumer protection rules.
What tire size can I fit after a 1.25-inch body lift?
A 1.25-inch body lift can help with 33-inch tires and may help some 35-inch setups, depending on wheel backspacing, fenders, suspension height, and how hard you wheel the Jeep. Tire fitment depends on the full setup, not the body lift alone.
Does a body lift affect ride quality?
A small body lift usually does not change ride quality because the suspension remains the same. Your shocks, springs, control arms, and axles are not changed. If the Jeep feels different after installation, check for loose bolts, rubbing parts, or unrelated issues.
Does a body lift improve ground clearance?
A body lift improves body clearance and tire clearance, but it does not raise the axles. The lowest parts under the Jeep, such as the differentials, only gain clearance when you install larger tires.
Is a 2-inch body lift too much for a JK?
A 2-inch body lift can work, but it is more noticeable and more involved than a 1-inch or 1.25-inch lift. It may need steering extension parts, gap guards, bumper adjustments, and more careful inspection. Most daily-driven JK owners are better served by a smaller body lift.
Is a body lift legal?
Small body lifts are generally common, but rules vary by location. Check your local vehicle inspection, roadworthy, MOT, state, province, or territory regulations. Pay attention to bumper height, lighting height, tire coverage, and overall vehicle safety rules.
Final Recommendation
A Jeep Wrangler JK body lift is a smart upgrade when your goal is simple tire clearance without changing the suspension. It is affordable, DIY-friendly, and practical for many 2007–2018 JK and JKU owners. The key is choosing the right lift height.
For most owners, a 1-inch or 1.25-inch body lift is the best choice. It adds useful clearance without creating too many extra fitment issues. Rough Country is a strong budget option, while TeraFlex is a good premium pick. M.O.R.E. and Daystar are worth considering if you want replacement-style mounts or a conservative setup. Performance Accessories-style 2-inch kits can work, but they require more attention to steering, gaps, and transmission fitment.
If you want a clean daily-driver upgrade, keep the body lift small. If you want bigger tires and better trail performance, combine a small body lift with a proper suspension lift instead of relying on body height alone.
Before publishing or ordering parts, confirm your Jeep’s year, door count, transmission, body mount hardware, and kit instructions. Install slowly, torque everything correctly, check all gaps, and re-torque after the first 100–200 miles.
A body lift is not the flashiest Jeep mod, but when done right, it is one of the simplest ways to make your JK more tire-friendly without breaking your budget.

“Cars aren’t just machines. They’re freedom, memory, and a little bit of grease under your fingernails.”
I’m Theodore Roosevelt—though my friends just call me “Ted” (and no, I’m not related to the president, though I do share his love for adventure). I grew up in Detroit in the 1970s, back when the city was still the heart of the American auto industry. My first love was a rusted-out 1967 Mustang my father and I rebuilt in our garage when I was fifteen. That project taught me that cars have souls. After spending twenty years as a mechanic and another ten writing for magazines, I started this blog to help everyday drivers and weekend wrenchers feel confident under the hood. Whether you’re restoring a classic or just trying to keep your daily driver alive for one more winter, I’m here to help you get there.