The Jeep Cherokee XJ is a legend in the off-road world, known for its unibody construction, compact size, and surprising capability. But for those who push beyond mild trails, the stock Dana 35 or Chrysler 8.25 rear axle, and the Dana 30 front, become the weak link. Upgrading to a Dana 60 axle is the gold standard for durability, allowing you to run massive tires, lockers, and powerful engines without fear of snapping shafts or grenading differentials. In 2026, the aftermarket has matured, making a Dana 60 swap more accessible than ever, but it remains a complex project that demands the right plan, parts, and patience.
This guide is designed to walk you through the entire process of installing a Dana 60 axle in your Jeep XJ. Whether you are building a dedicated rock crawler or a weekend warrior, understanding the required kits, tools, and fabrication steps is critical to success. We will cover everything from axle selection and spring perches to brake lines and steering geometry, ensuring you have a clear roadmap before you cut, weld, or bolt anything onto your Cherokee. By the end of this article, you will know exactly what you need to buy, build, and budget for a reliable and capable Dana 60 swap.
Choosing The Right Dana 60 Axle For Your XJ
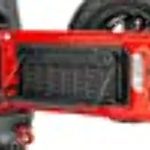
The first and most critical decision is selecting the correct Dana 60 core. Not all Dana 60s are created equal. For the front of an XJ, you will typically look for a passenger-side drop axle, commonly found in Ford F-250s and F-350s from the late 1970s through the 1990s. These axles have the correct differential placement to match the XJ’s transfer case output. For the rear, a driver-side drop axle from a Ford van or truck is common, though you can also use GM or Dodge Dana 60 with a custom driveshaft. The width is also a major factor; a full-size truck axle is roughly 67-69 inches wide, which will stick out significantly beyond the XJ’s stock fenders. Many builders opt to narrow the axle by 4-6 inches to improve clearance and fitment with aftermarket flares.
Once you have a core axle, you must assess its condition and specifications. Look for an axle with 35-spline shafts, as these are the strongest and most common for high-horsepower builds. The kingpin style (found on older Ford axles) is generally preferred over the later ball-joint style due to its strength and ease of service. Check the housing for cracks, bent tubes, or severe rust. In 2026, you can find complete, rebuilt Dana 60s from specialty retailers like Dynatrac, Currie Enterprises, or Solid Axle Industries, but these come at a premium. A junkyard core, costing between $300 and $800, is a budget-friendly starting point, but factor in the cost of a full rebuild kit, new bearings, seals, and possibly new gears and a locker.
Finally, consider your intended use. For a daily driver that sees occasional trail duty, a stock-width Dana 60 with a limited-slip differential and 4.10 gears might suffice. For a hardcore rock crawler, you will want a narrowed housing, 5.13 or deeper gears, a spool or selectable locker (like an ARB Air Locker or Eaton E-Locker), and chromoly axle shafts. Your choice of steering knuckles is also vital; high-steer arms from companies like Offroad Design or WFO Concepts will improve steering geometry and prevent bump steer when the suspension is lifted. Take your time researching and sourcing the right axle, this decision dictates every subsequent step of the install.
Essential Kits And Fabrication Components
A Dana 60 swap is not a bolt-in affair; it requires a collection of specialized kits and fabricated parts. The most important kit is the spring perch and shock mount kit. Since the XJ uses leaf springs in the rear and coil springs in the front, you will need to weld on new spring perches to the Dana 60 housing. For the front, you will need coil spring buckets that match your lift height and shock mounts that clear the axle tubes. Companies like RuffStuff Specialties, Barnes 4WD, and TNT Customs offer universal weld-on kits that include heavy-duty perches, shock tabs, and bump stop pads. Do not skimp on these; cheap perches can crack under load, leading to catastrophic failure.
Next, you need a steering and track bar kit. The stock XJ steering is inadequate for a Dana 60. You will need a crossover or high-steer system that connects the steering box pitman arm to the passenger-side knuckle, and a drag link from that knuckle to the driver-side knuckle. This requires a new steering box brace, a heavy-duty pitman arm, and custom-length tie rods and drag. A track bar (panhard bar) is also essential to center the axle under the vehicle. You can buy a complete steering kit from vendors like Iron Rock Off Road or CavFab, or piece one together using DOM tubing, weld-on bungs, and heim joints. Remember that the steering geometry must be parallel to the drag link to avoid bump steer.
Finally, you will need a brake line kit and a driveshaft kit. The stock rubber brake lines will be too short and too weak. Upgrade to stainless steel braided lines with extended lengths, and consider adding a proportioning valve to adjust brake bias for the larger Dana 60 brakes. For the driveshaft, you will almost certainly need a custom unit. The Dana 60 has a larger pinion yoke than the stock axles, and the swap will change the length and angle of the driveshaft. Have a local driveshaft shop build a new shaft using 1350-series U-joints and a slip yoke eliminator (SYE) kit for your transfer case. A complete swap kit from a company like Advance Adapters can simplify this process, but expect to spend between $500 and $1,200 on driveshafts alone.
Tools And Workspace Preparation
Before you even touch your XJ, gather the right tools. This is not a job for a basic socket set. You will need a heavy-duty floor jack, four jack stands rated for at least 6 tons, and a transmission jack or a dedicated axle jack to safely maneuver the heavy Dana 60 into place. A good 220-volt welder is non-negotiable; a 110-volt unit might work for small tacks, but you need a 220-volt MIG or stick welder with enough amperage to penetrate the thick axle housing tubes. A plasma cutter or a high-quality angle grinder with cut-off wheels will be used constantly for trimming brackets, cutting off old perches, and shaping new mounts.
Precision measuring tools are equally important. A digital angle finder is critical for setting pinion angles correctly. A long tape measure, a framing square, and a plumb bob will help you center the axle and align the spring perches. You will also need a large set of wrenches (up to 1-1/2 inch or 36mm) for the Dana 60’s large hardware, a ball joint press (if you are using a ball-joint axle), and a torque wrench that goes up to 250 ft-lbs. Do not forget safety gear: welding helmet, heavy gloves, fire extinguisher and eye protection. A well-ventilated workspace is essential, as you will be grinding and welding for hours.
Your workspace should be large enough to park the XJ and have the axle on a workbench or cart nearby. Concrete floor is ideal. Plan for at least a full weekend for the swap, but realistically, a first-timer should budget a week. Have a parts washer or a bucket of degreaser ready to clean the axle housing before welding. Organize your hardware in labeled bins; you will have dozens of bolts, nuts, and washers from the old and new axles. Label all brake lines and electrical connectors before disconnecting them. A clean, organized workspace directly translates to a safer and faster install, reducing the chance of losing critical parts or making alignment errors.
Step-By-Step Installation Process
Begin by safely lifting the XJ and removing the stock axles. Support the vehicle on jack stands placed under the frame rails, not the axles. Disconnect the brake lines, parking brake cables, driveshafts, shock absorbers, and track bar. For the front, unbolt the coil springs and control arms. For the rear, unbolt the leaf spring shackles and main eye bolts. Roll the stock axles out under the vehicle. This is a good time to inspect and replace any worn bushings or hardware on the XJ’s suspension. Clean the Dana 60 housing thoroughly, then weld on the new spring perches and shock mounts. Use the angle finder to set the pinion angle to match the transfer case output (typically 1-2 degrees lower than the driveshaft angle to account for axle wrap under load).
Next, install the Dana 60 into the vehicle. This is a two-person job due to the weight. Use the transmission jack to lift the axle into position. For the front, install the coil springs and seat them in the new buckets. For the rear, install the leaf springs onto the new perches and tighten the U-bolts to the manufacturer’s torque spec. Reinstall the shocks, but leave them loose until the vehicle is on the ground. Now, install the steering system. Bolt the new pitman arm to the steering box, then connect the drag link and tie rod. Adjust the tie rod length to set the toe-in to approximately 1/8 inch. Install the track bar, ensuring it is parallel to the drag link. Cycle the steering lock-to-lock to check for binding with the frame or suspension components.
Finally, address the brakes and driveshafts. Install the new stainless steel brake lines, bleeding the system thoroughly with fresh DOT 4 fluid. Adjust the proportioning valve if needed to prevent rear wheel lockup. Install the custom driveshafts, ensuring the slip yoke has adequate travel. Lower the vehicle onto its tires and bounce the suspension to settle it. Re-check all bolt torques,ion angles, and steering alignment. Test drive the vehicle slowly in a large parking lot, listening for unusual noises and checking for vibrations. A slight vibration at highway speeds may require adjusting the pinion angle or having the driveshaft re-balanced. This process is iterative; do not be afraid to make small adjustments.
Frequently Asked Questions
Can I install a Dana 60 without welding?
No, a Dana 60 swap requires welding new spring perches, shock mounts, and often track bar brackets to the axle housing. While some bolt-on kits exist specific axles, the Dana 60 is not a direct bolt-in for the XJ. You must weld to ensure the mounts are secure and properly aligned. If you cannot weld, hire a professional fabricator or take the axle to a local welding shop.
much does a full Dana 60 swap cost for an XJ?
A budget build using a junkyard axle and DIY fabrication can cost between $,500 and $4,000, including the axle, rebuild kit, gears, lockers, and custom driveshafts. A premium build with a new aftermarket axle, high-steer kit, and professional installation can easily exceed $8,000 to $12,000. The cost varies greatly based on the quality of components and whether you do the labor yourself.
Will a Dana 60 fit under stock XJ fenders?
A stock-width Dana 60 (around 67-69 inches) will stick out significantly beyond the stock fenders, typically 3-5 inches per side. You will need aftermarket wide flares or tube fenders cover the tires legally and protect the vehicle from mud and debris. Narrowing the axle to 63-65 inches improves fitment but adds significant fabrication cost.
Do I need to upgrade my transmission and transfer case for a Dana 60?
While not strictly required, the added weight and traction of a Dana 60 can stress the stock AX-15 or AW4 transmission and NP231 transfer case. It is highly recommended to install a heavy-duty transmission cooler, a slip yoke eliminator (SYE) kit, and possibly upgrade to a stronger transfer case like the NP241 or Atlas II. The stock drivetrain can handle moderate use, but hard wheeling will find its weak points.
What is the best gear ratio for a Dana 60 in an XJ?
The best gear ratio depends on tire size and engine. For 35-inch tires, 4.56 or 4.88 gears are common. For 37-inch tires, 5.13 or 5.38 gears are ideal. For 40-inch tires and larger, 5.89 or deeper gears are recommended. The goal is to restore the engine’s powerband to near-stock RPMs at highway speeds. Use an online gear ratio calculator with your specific tire diameter and desired cruising RPM.
Conclusion
Installing a Dana 60 axle in your Jeep XJ is a transformative upgrade that unlocks a new level of off-road capability and reliability. By carefully selecting the right axle core, investing in quality fabrication kits, and following a methodical installation process, you can build a drivetrain that will withstand the most demanding trails. The key is patience and precision; rushing through pinion setup or welding can lead to costly failures. Remember that this project is as much about the journey as the destination, and the skills you learn will serve you well in future builds.
Now is the time to plan your build. Start by sourcing a clean Dana 60 core and gathering the essential tools listed in this guide. Join online forums like CherokeeForum.com or r/CherokeeXJ on Reddit to ask questions and learn from others who have completed the swap. In 2026, the resources and community support are better than ever. Do not be intimidated by the complexity; break the project into manageable steps, and soon you will be behind the wheel of an XJ that can conquer any terrain with confidence. Get your welding helmet ready and start building.

“Cars aren’t just machines. They’re freedom, memory, and a little bit of grease under your fingernails.”
I’m Theodore Roosevelt—though my friends just call me “Ted” (and no, I’m not related to the president, though I do share his love for adventure). I grew up in Detroit in the 1970s, back when the city was still the heart of the American auto industry. My first love was a rusted-out 1967 Mustang my father and I rebuilt in our garage when I was fifteen. That project taught me that cars have souls. After spending twenty years as a mechanic and another ten writing for magazines, I started this blog to help everyday drivers and weekend wrenchers feel confident under the hood. Whether you’re restoring a classic or just trying to keep your daily driver alive for one more winter, I’m here to help you get there.