
A leaf spring relocation kit install Jeep XJ job moves or adjusts the rear shackle mounting point so the leaf spring can cycle better. It matters because poor shackle angle can make your Cherokee ride harsh, bind off-road, or sit uneven after a lift.
If your Jeep XJ rides like a shopping cart, sits nose-high, or bangs over small bumps after a lift, the rear shackle angle may be the real problem. I have seen good leaf springs blamed for bad ride quality when the issue was a tight, upright, or poorly placed rear shackle.
In this guide, I will walk you through what a leaf spring relocation kit does, how to install one on a Jeep Cherokee XJ, what tools you need, what can go wrong, and when the job should go to a shop. I will also cover cost, safety, legal checks, and the small fitment details that make the rear suspension feel right.
Pain Points: Jeep XJ Owners Face Before Installing a Leaf Spring Relocation Kit
Problem 1: The Rear Shackles Sit Too Straight
A lifted Jeep Cherokee XJ often ends up with rear shackles that sit nearly vertical. That looks harmless, but it can make the rear leaf spring fight itself instead of moving freely.
This usually happens after installing lift leaf springs, add-a-leafs, longer shackles, or old spring packs with too much arch. The shackle needs room to swing as the spring flattens and returns.
The fix is simple in idea: move the rear shackle mounting point so the shackle rests at a better angle under the Jeep’s normal weight. For most street and trail XJs, I like to see a rear shackle that has a clear rearward lean at ride height, without being so far back that it hits the box or bumper structure.
“Proper a 90-degree shackle angle allows the spring to do its job through the maximum possible travel in both compression and extension.” — Jonathan Hanson, Exploring Overland Writer
That quote is about shackle movement, not a magic number for every XJ. The key lesson is this: the shackle should be placed so the spring can compress and droop without binding.
Problem 2: Rust Makes the Install Harder Than the Kit
On a clean Arizona XJ, this job can feel direct. On a Michigan, Ontario, or UK winter Jeep, rust can turn a basic install into a fight.
The original shackle bolts may seize inside the bushing sleeve. The rear shackle box may be thin. The fuel filler guard bolts can snap. The unibody around the rear mount may look solid until a grinder touches it.
My practical solution is to inspect before buying parts. Crawl under the rear of the Jeep with a light and a small hammer. Tap around the shackle box, rear frame rail, hitch nut plate area, and leaf spring eye. If the metal flakes, bends, or sounds hollow, do not bolt a relocation kit to it and hope for the best.
For a rusty XJ, budget for extra parts:
- New shackles
- New leaf spring eye bolts
- New bushings
- Nut plates or frame hardware
- Rust repair plates or frame stiffeners
- Professional welding if the structure is weak
Problem 3: People Install the Kit Before Checking the Whole Rear Suspension
A relocation kit will not fix every rear suspension issue. If your leaf packs are bent, bushings are torn, shocks are too short, U-bolts are loose, or the axle is not centered, the Jeep may still ride badly after the kit.
I once looked at a 2000 Jeep Cherokee XJ on 33-inch tires that had a fresh shackle relocation setup. The owner hated the ride. The problem was not the brackets. The shocks were topping out, the rear brake hose was stretched at droop, and one leaf pack had a cracked main leaf near the eye.
Before the install, check:
- Leaf spring condition
- Shackle bushing wear
- Rear shock length
- Brake hose length
- Axle U-bolts
- Pinion angle
- Bump stop clearance
- Tire clearance at full stuff
Key takeaway: relocation brackets improve shackle geometry, but they do not replace a full suspension inspection.
How a Leaf Spring Relocation Kit Works on a Jeep XJ
The Jeep Cherokee XJ uses leaf springs in the rear. The front eye of the spring mounts to the body, the axle sits on the spring pack, and the rear eye connects to a shackle. That shackle lets the spring change effective length as it flexes.
A relocation kit changes where the upper shackle point sits. Some kits bolt into the rear frame and hitch nut plate area. Others require cutting out the factory shackle box. Some are “no lift” designs, while others may add a little height depending on hole choice and shackle length.
Most XJ owners install one for four reasons:
- Better shackle angle after a lift
- Smoother rear ride
- More rear suspension travel
- Cleaner fit with longer shackles or rear stretch setups
A Jeep XJ is a unibody vehicle, not a body-on-frame truck. That matters. You are mounting suspension loads into sheet-metal structure. If the mounting area is rusty, cracked, or poorly drilled, the kit can move under load.
For a weekend trail XJ, that can mean clunks and bad handling. For a road-driven Jeep, it can become a safety issue.
Tools and Parts You Need Before Starting
Do not start this job with only basic hand tools and hope the Jeep cooperates. XJs are old now, and many have years of rust, mud, and previous owner repairs.
For a normal bolt-on shackle relocation kit, I would prepare:
- Floor jack
- Heavy jack stands
- Wheel chocks
- Metric and SAE socket sets
- Breaker bar
- Torque wrench
- Drill and quality drill bits
- Grinder or cut-off wheel
- Hammer and pry bar
- Penetrating oil
- Paint marker
- Tape measure
- Safety glasses and gloves
- Rust converter or primer
- Chassis paint
- Anti-seize
- Thread locker if the kit maker calls for it
For tougher installs, you may also need:
- Air hammer
- Reciprocating saw
- Bolt extractor kit
- Welder
- Frame stiffeners
- Replacement nut plates
- New spring and shackle hardware
Do not reuse damaged bolts. Suspension hardware takes repeated load. If the bolt is deeply rusted, stretched, rounded, or pitted, replace it.
I also recommend laying out the kit before touching the Jeep. Match each bolt, washer, nut, bracket, and spacer to the instructions. If something is missing, stop. Do not substitute random hardware from a coffee can for rear suspension mounting.
Cost Breakdown: DIY vs Professional Install
A leaf spring relocation kit install Jeep XJ job can be cheap or expensive depending on rust and shop labor.
Here is a realistic range:
- Relocation kit: $120–$250 USD / £95–£200 GBP / $165–$340 CAD / $185–$380 AUD
- New shackles: $50–$150 USD / £40–£120 GBP / $70–$205 CAD / $75–$230 AUD
- New hardware and bushings: $40–$120 USD / £30–£95 GBP / $55–$165 CAD / $60–$180 AUD
- DIY supplies: $30–$100 USD / £25–£80 GBP / $40–$135 CAD / $45–$150 AUD
- Professional install: $300–$900 USD / £250–£750 GBP / $410–$1,225 CAD / $460–$1,380 AUD
Rust repair, welding, frame stiffeners, or broken bolt removal can push the total much higher.
If your XJ is clean and you already own tools, DIY makes sense. If the shackle box is rusty, the unibody is thin, or the kit requires welding, I would rather pay a fabrication shop than gamble with rear suspension mounts.
“Any experienced tech will do.” — John Ibbotson, Consumer Reports Chief Mechanic
That advice fits the basic side of suspension work. For cutting and welding on an XJ unibody, I would go one step further and choose a shop that understands Jeeps, lifted 4x4s, and unibody repair.
Step-by-Step Leaf Spring Relocation Kit Install Jeep XJ Guide
Step 1: Park Safely and Measure First
Park on level ground. Chock the front wheels. Measure from the rear axle centerline to the fender flare on both sides. Then measure the current shackle angle.
Take photos before removing anything. This gives you a reference if the Jeep sits uneven later.
Also measure:
- Rear ride height
- Tire-to-fender clearance
- Shackle-to-bumper clearance
- Brake hose slack
- Shock extension length at rest
If the Jeep already sits crooked, write that down. Do not blame the kit later if the issue was there before the install.

Step 2: Lift the Jeep and Support the Body
Loosen the rear lug nuts. Jack up the rear of the Jeep and place jack stands under the unibody rail or solid support points ahead of the leaf spring mount area.
Support the rear axle with a floor jack. You want the axle controlled, not hanging from brake hoses or shocks.
Remove the rear wheels. Keep the jack under the axle so you can raise or lower it slightly as needed.
Never work under a Jeep supported only by a floor jack. I know that sounds basic, but this job involves pulling, cutting, drilling, and pushing on suspension parts. The Jeep must be stable.

Step 3: Remove the Shackle and Factory Hardware
Spray the upper and lower shackle bolts with penetrating oil. Let it sit. If the bolts look original, give them more time.
Remove the lower shackle bolt first, then the upper. On some kits, you may also need to remove the fuel filler guard, rear hitch bolts, or factory shackle box.
A common issue is the bolt spinning but not coming out. That usually means the inner sleeve is seized to the bolt. Heat can help, but be careful near the fuel filler area. If the bolt will not move, cutting may be safer.
This is where many DIY installs slow down. Do not rush. A damaged mounting hole or torn shackle box makes the final fit harder.

Step 4: Test Fit the Relocation Brackets
Hold the relocation bracket in place before drilling or cutting. Check how it sits against the rear body structure. The bracket should sit flat. If undercoating, rust scale, or old seam sealer keeps it from sitting tight, clean the area first.
Mark the holes with a paint marker. If the kit uses existing hitch nut plate holes, start with those fasteners loose. Do not fully tighten one side before the other side is aligned.
For kits that require factory shackle box removal, cut slowly. Remove only what the instructions call for. Paint bare metal before final assembly.
Some no-lift kits still need drilling, cutting, and grinding. That is normal. What is not normal is forcing a bracket into place with a jack or impact gun because the holes do not line up.

Step 5: Drill Clean Holes and Protect the Metal
Use sharp drill bits and start with a smaller pilot hole. Keep the drill square to the surface. If you drill at an angle, the bolt may load the bracket unevenly.
After drilling, deburr the hole. Paint the exposed metal. This small step matters a lot on XJs in the UK, Canada, northern USA, and coastal Australia, where salt or moisture can attack bare steel fast.
If a bolt passes through the rear floor, check inside the Jeep first. Move carpet, wiring, and trim away from the drilling area. I have seen melted carpet and nicked wiring from people drilling blind.

Step 6: Install the Brackets Loose
Install all bracket hardware by hand first. Do not tighten anything fully until every bolt is started.
This helps the bracket self-align. If one bolt will not start, stop and check the hole. Cross-threading a suspension bolt is a bad trade for saving five minutes.
Use the supplied washers and spacers in the right place. If the kit uses flag nuts or nut plates, make sure they sit flat and do not twist as you tighten.

Step 7: Choose the Right Shackle Hole
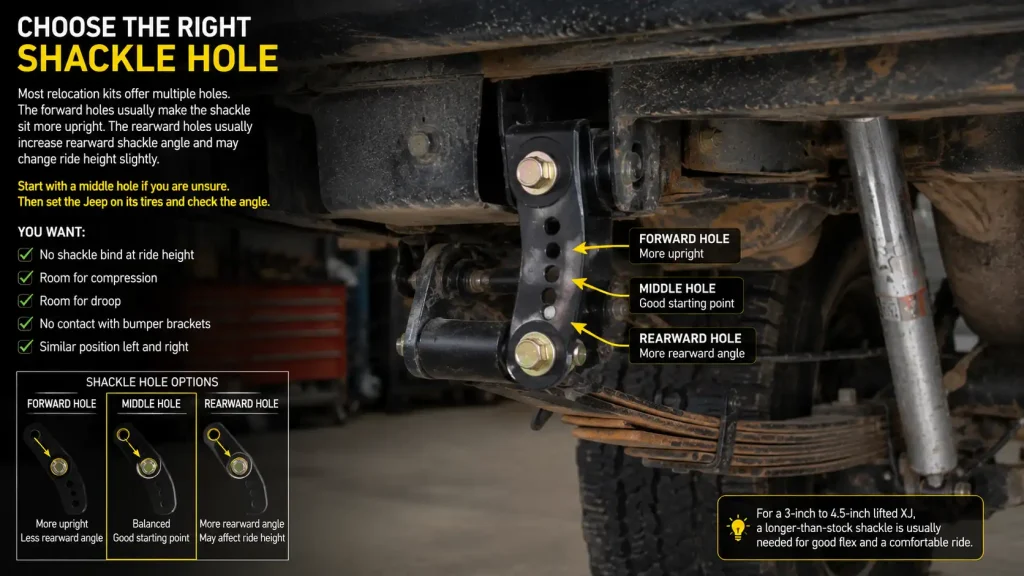
Most relocation kits offer multiple holes. The forward holes usually make the shackle sit more upright. The rearward holes usually increase rearward shackle angle and may change ride height slightly.
Start with a middle hole if you are unsure. Then set the Jeep on its tires and check the angle.
You want:
- No shackle bind at ride height
- Room for compression
- Room for droop
- No contact with bumper brackets
- Similar position left and right
For a 3-inch to 4.5-inch lifted XJ, a longer-than-stock shackle with the relocation kit often works well. Stock shackles can work with some kits, but adjustment may be limited.
Step 8: Tighten at Ride Height
This step is easy to skip, and it matters. Rubber bushings should be tightened with the Jeep sitting at normal ride height, not with the axle hanging.
Install the shackles and leaf spring bolts loose. Reinstall the wheels. Lower the Jeep onto the ground. Bounce the rear a few times to settle it.
Then torque the shackle and spring bolts to the correct spec from your kit instructions or service manual. Tightening the bushings at full droop can preload them. That can cause a harsh ride and early bushing wear.
“Take it to a good front and alignment shop and have it aligned correctly.” — Scotty Kilmer, Mechanic and Automotive YouTuber
Even though this job is at the rear, the advice is still useful. After suspension work, a proper inspection and alignment check help catch issues before the first long drive.

Step 9: Check Brake Lines, Shocks, and Pinion Angle
Now cycle the rear suspension as much as you safely can. Lift one side of the axle and let the other droop. Watch the brake hose, shocks, shackles, and leaf spring eyes.
Check for:
- Brake hose tension
- Shock topping out
- Shackle hitting the bracket
- Leaf spring rubbing
- Exhaust contact
- Tire contact
- Driveshaft vibration
- Pinion angle changes
If you feel a vibration after the install, check pinion angle. A relocation kit can change rear ride height slightly, and that can affect driveline angle on lifted XJs.

Safety, Legal, and Inspection Notes by Country
A Jeep XJ leaf spring relocation kit is a suspension modification. That means safety and legal rules matter.
In the USA, inspection rules vary by state. Some states care mainly about lights, brakes, tires, and emissions. Others may check suspension condition more closely. NHTSA is the official safety body, and I would use its recall and safety resources as the external reference before road testing an older Cherokee.
In the UK, suspension changes can affect MOT results and insurance. If the vehicle is structurally modified, check GOV.UK guidance and make sure the insurance policy still covers the Jeep.
In Canada, rules vary by province. In Ontario, MTO safety standards matter during registration or transfer. A modified XJ with loose mounts, rusted structure, poor tire clearance, or unsafe steering and suspension can fail inspection.
In Australia, state and territory rules apply. VSB 14 gives technical guidance for light vehicle modifications, and major suspension or structural changes may need approval. If your XJ needs a roadworthy certificate, ask before cutting into the rear structure.
Key takeaway: a clean install is not just about trail flex. It must be safe on public roads.
Common Mistakes to Avoid
The first mistake is installing the kit on weak metal. If the XJ rear structure is rusted, fix the structure first.
The second mistake is using the wrong hardware. Suspension bolts should match the kit maker’s grade, size, and length. Do not use soft hardware-store bolts.
The third mistake is over-tightening with an impact gun. Torque matters. Too loose can let the bracket move. Too tight can damage threads or crush parts.
The fourth mistake is ignoring shackle angle after the Jeep is on the ground. Always judge final fit at ride height.
The fifth mistake is skipping the retorque. After the first 100 miles, check all fasteners. Check again after trail use. A relocation kit sees shock load, axle wrap, vibration, and body flex.
DIY or Professional Install: My Honest Advice
DIY is fine if:
- The Jeep is clean underneath
- The kit is bolt-on
- You have a drill, torque wrench, and safe stands
- You can remove old bolts without heat near fuel lines
- You understand bushing preload and suspension movement
Use a professional if:
- The factory shackle box is rusty
- The kit requires welding
- Frame stiffeners are needed
- You must cut major structure
- You are unsure about road legality
- The Jeep carries family, work tools, or camping weight on highways
A shop that works on lifted 4x4s will usually finish the job faster and cleaner. They can also spot worn leaf springs, bad bushings, cracked mounts, and unsafe previous repairs.
Final Fitment Checklist Before the Test Drive
Before driving, check:
- All bracket bolts torqued
- Leaf spring bolts torqued at ride height
- Shackles match left and right
- Brake hose has slack
- ABS wiring, if fitted, is clear
- Shocks have enough travel
- Tires do not rub
- Exhaust clears shackles and leaf springs
- Fuel filler guard is reinstalled if removed
- Bare metal is painted
- No tools left under the Jeep
Start with a slow drive around the block. Listen for clunks, pops, or scraping. Then check the bolts again.
After that, drive at 30–40 mph and feel for rear steer, vibration, or wandering. If the Jeep feels loose, stop and inspect. Do not take it straight to the highway or trail.
Frequently Asked Questions
What does a leaf spring relocation kit do on a Jeep XJ?
A leaf spring relocation kit changes the rear shackle mounting position. On a lifted Jeep XJ, this helps the shackle sit at a better angle so the rear suspension can move without binding.
Does a Jeep XJ shackle relocation kit add lift?
Some kits are sold as no-lift designs, while others may add a small amount depending on hole choice and shackle length. After installation, measure ride height on both sides and adjust if needed.
Can I install a leaf spring relocation kit without welding?
Yes, some Jeep XJ kits are bolt-on, but many still require drilling, cutting, or removing the factory shackle box. If your unibody is rusty or cracked, welding or reinforcement may be needed.
What is the best shackle angle for a Jeep XJ?
There is no one number that fits every Jeep, but the shackle should lean enough to move through compression and droop without binding. Check the angle at ride height, not while the axle is hanging.
Do I need an alignment after installing rear shackle relocation brackets?
The rear axle is fixed by the leaf springs, so a basic rear shackle kit does not adjust front toe or caster. Still, after suspension changes, I recommend a full inspection and alignment check, especially on lifted XJs.
Conclusion
A leaf spring relocation kit install Jeep XJ job can make the rear suspension ride smoother, flex better, and fit lifted leaf packs with less bind. The three things that matter most are solid mounting metal, correct shackle angle at ride height, and proper final torque.
Do not rush the cutting, drilling, or test-fit stage. A clean install can make your XJ feel tighter and more predictable, while a careless install can create clunks, rust problems, and safety risks.
Take your time, measure twice, protect the metal, and check the Jeep again after the first drive.

“Cars aren’t just machines. They’re freedom, memory, and a little bit of grease under your fingernails.”
I’m Theodore Roosevelt—though my friends just call me “Ted” (and no, I’m not related to the president, though I do share his love for adventure). I grew up in Detroit in the 1970s, back when the city was still the heart of the American auto industry. My first love was a rusted-out 1967 Mustang my father and I rebuilt in our garage when I was fifteen. That project taught me that cars have souls. After spending twenty years as a mechanic and another ten writing for magazines, I started this blog to help everyday drivers and weekend wrenchers feel confident under the hood. Whether you’re restoring a classic or just trying to keep your daily driver alive for one more winter, I’m here to help you get there.