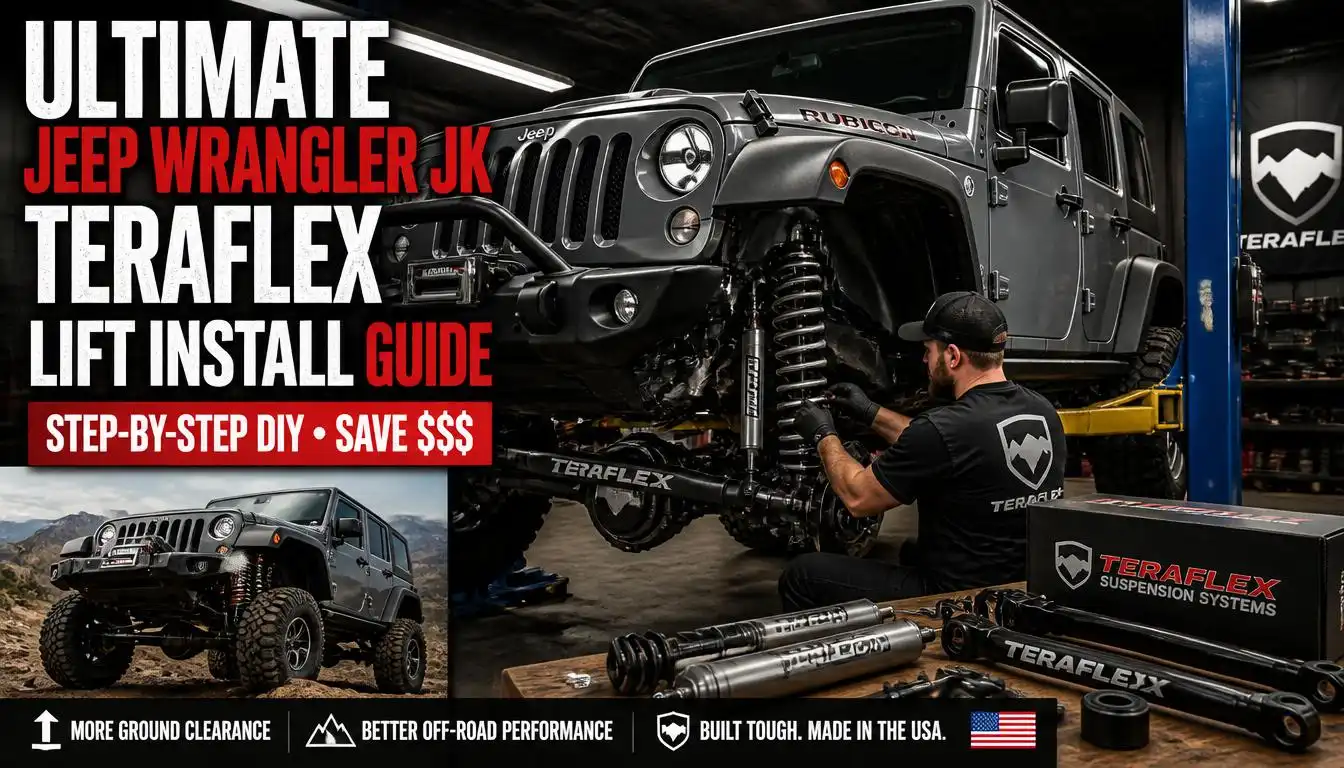
Installing a suspension lift is one of the most rewarding modifications you can do to your Jeep. If you are looking for the definitive Jeep Wrangler JK Teraflex Lift Install Guide, you are in the right place.
Whether you are bolting on a 2.5″ Base kit for a subtle stance and 33-inch tires, or tackling the heavy-duty 4.5″ Evolution system for 35s and serious rock crawling, Teraflex engineering is designed to maintain optimal ride quality. Their Dual Rate Coil Springs and Velocity Specific Sensing (VSS) shocks are industry benchmarks.
However, the 2007-2018 JK platform has unique quirks from Electronic Sway Bar Disconnects (ESBD) to specific steering geometries. This comprehensive guide covers every technical detail, torque spec, and electronic recalibration required to get it right the first time.
Disclaimer: This guide is for educational purposes. Suspension work involves heavy components and critical safety systems. If you are unsure about any step, consult a certified 4×4 mechanic. Always use proper jack stands; never rely solely on a hydraulic jack.
Table of Contents
- Step 1: Preparation, Teardown & ESBD Precautions
- Step 2: Front Suspension & Geometry Correction
- Step 3: Rear Suspension & Track Bar Installation
- Step 4: Shocks, Sway Bar Links & Brake Lines
- Crucial Torque Specs Chart (Jeep FSM Reference)
- Post-Installation: Alignment, Electronics & Drivetrain
- Common Mistakes to Avoid
- Frequently Asked Questions (FAQ)
Pre-Installation Checklist & Tools Required
Before you break out the impact gun, ensure you have the right setup. The JK requires both Metric and SAE tools, and having the right specialty tools will save you hours of frustration.
Compatibility & Kit Verification
- JK Generation: Confirm your kit matches your generation (2007-2011 vs. 2012-2018, as minor mounting points changed).
- Lift Height: 2.5″ kits usually retain factory control arms. 3.5″ and above require adjustable control arms and Geometry Correction Brackets.
Essential Tools List
- Socket & Wrench Sets: Full Metric and SAE sets (including deep wells).
- Torque Wrench & Torque Angle Meter: Crucial for factory-spec tightening.
- Coil Spring Compressor: Specifically designed for JK front struts.
- Hydraulic Jack & High-Quality Jack Stands: Rated for at least 3 tons.
- Penetrating Oil: PB Blaster or WD-40 Specialist (soak factory bolts the night before).
- Die Grinder / Dremel: Sometimes required for minor bracket clearancing.
- Breaker Bar & Impact Wrench: For stubborn factory suspension bolts.
Estimated Time: 6 to 10 hours (Intermediate to Advanced DIY).
Step-by-Step Teraflex Lift Installation
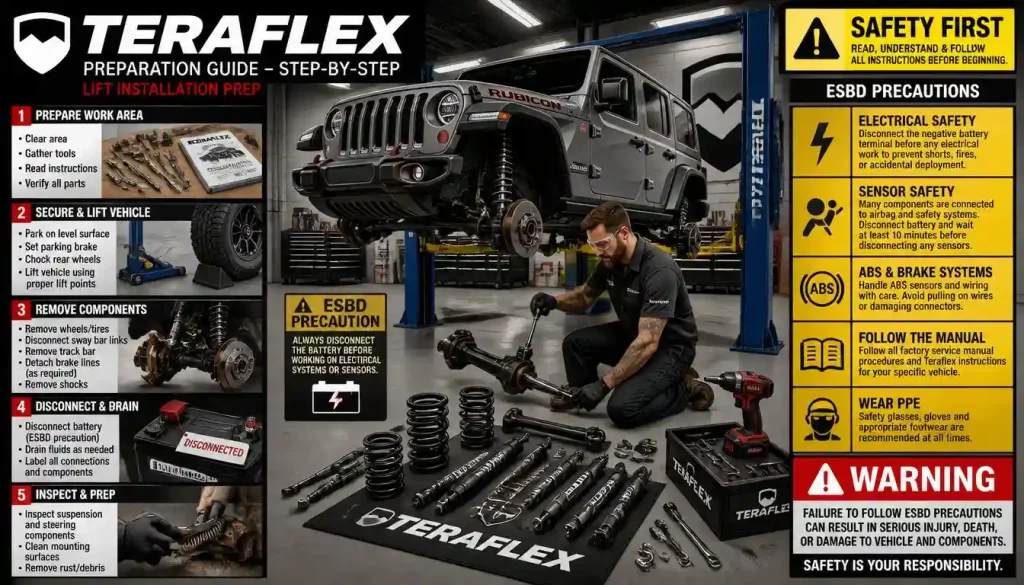
Step 1: Preparation, Teardown & ESBD Precautions
- Park on Level Ground: Engage the parking brake and chock the rear wheels.
- ESBD Warning (Rubicon Models): If your JK is equipped with the Electronic Sway Bar Disconnect (ESBD), you must disconnect the electrical connector and secure the motor out of the way before removing the sway bar links. Note: The system will require a recalibration drive cycle after the new links are installed.
- Lift and Support: Jack up the front axle and place jack stands under the frame rails. Repeat for the rear. Never let the axle hang completely unsupported while disconnecting brake lines; support the axle with a jack to control the drop.
- Teardown: Remove the front and rear wheels. Disconnect the sway bar links, shock absorbers, and track bars.
- Coil Removal: Lower the axle slowly using the floor jack until the factory coil springs are loose. Remove the factory coils and rubber isolators.
Step 2: Front Suspension & Geometry Correction
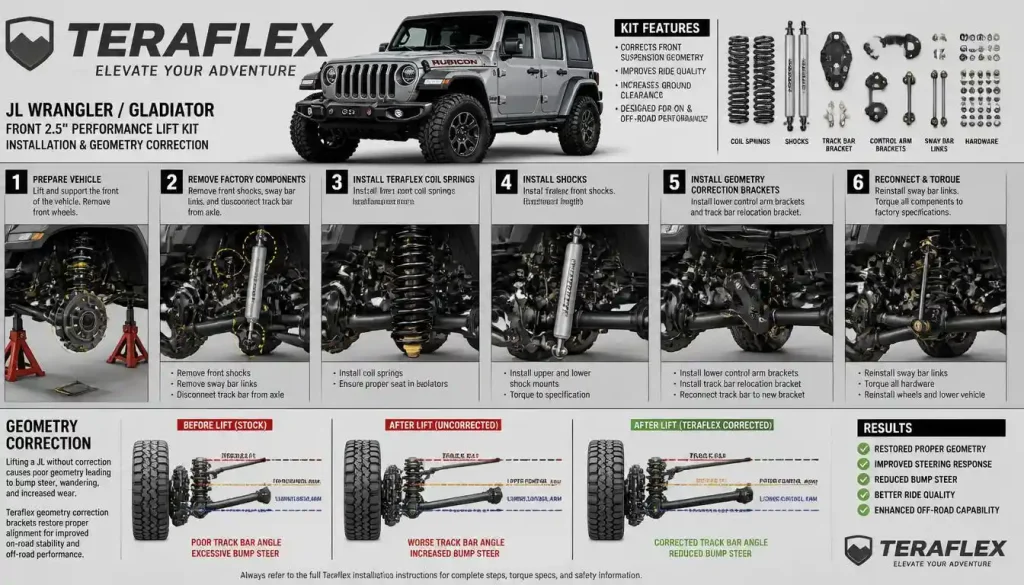
- Install Front Coil Springs: Place the Teraflex Dual Rate Coil Springs into the lower retainer. Ensure the spring pigtail is positioned correctly (usually facing forward or as specified in the Teraflex manual) to prevent binding. Install the new Teraflex coil isolators on top.
- Control Arms (3.5″ Lifts and above): If your kit includes Teraflex Geometry Correction Brackets or adjustable front lower/upper control arms, install them now.
- Pro-Tip: Set the adjustable arms to the factory length initially. You will fine-tune the caster angle later during alignment.
- Front Track Bar Relocation: Install the Teraflex Front Track Bar Relocation Bracket. This is critical for axle centering within the wheel wells. Bolt the new adjustable track bar into the relocated bracket.
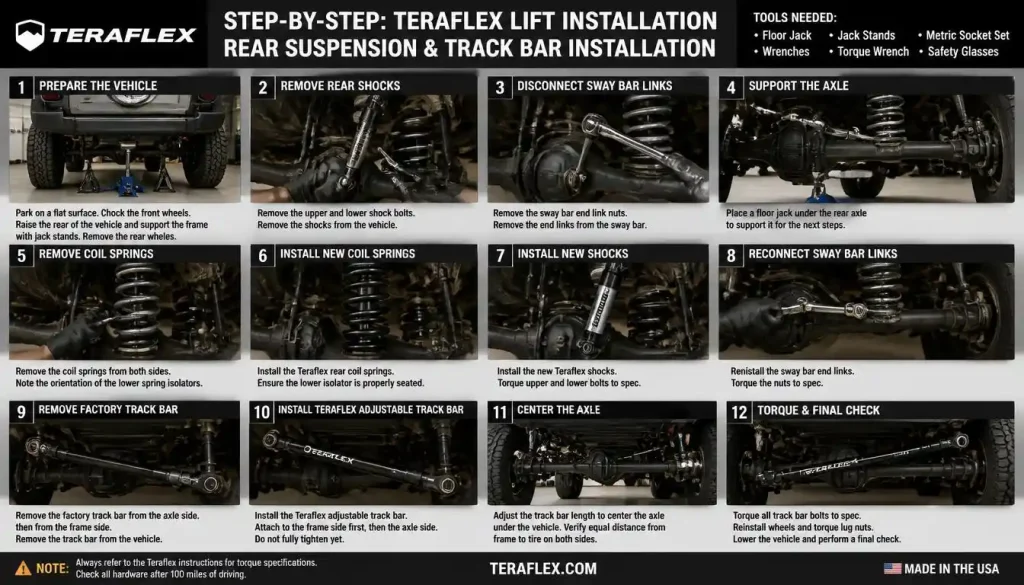
Step 3: Rear Suspension & Track Bar Installation
- Rear Coils & Bump Stops: Install the Teraflex rear coil springs. If your kit includes Bump Stop Extensions, bolt them to the lower control arm mounts to prevent the new, taller coils from over-compressing off-road.
- Rear Control Arms: Install the rear adjustable lower and upper control arms. The rear upper control arm is vital for setting the pinion angle, which prevents driveshaft vibrations.
- Rear Track Bar: Install the Rear Adjustable Track Bar. This allows you to perfectly center the rear axle under the chassis, correcting the shift caused by the lift height.
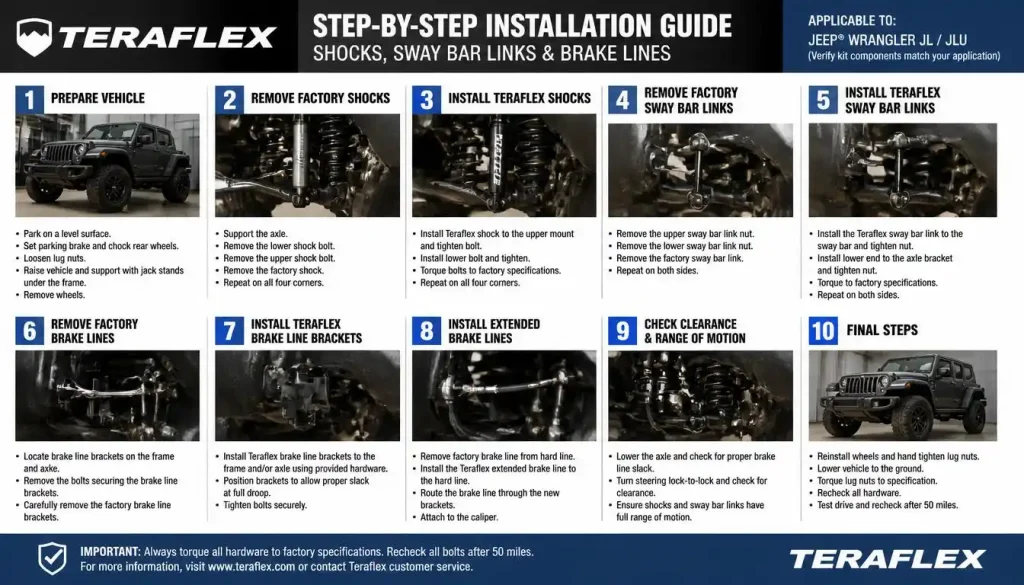
Step 4: Shocks, Sway Bar Links & Brake Lines
- Extended Brake Lines: If you are running a 3″ or taller lift, Extended Stainless Steel Brake Lines are mandatory to prevent line stretch and failure at full articulation. Route them exactly as the factory lines were, ensuring they do not rub against the axle or frame.
- Install Teraflex VSS Shocks: Mount the Velocity Specific Sensing (VSS) shocks. Ensure the reservoirs (if equipped) are mounted securely and the hoses are not kinked.
- Sway Bar Links: Install the new Teraflex quick-disconnect or fixed-length sway bar links. Reconnect the ESBD motor if equipped.
- Steering Shaft Relocation: For lifts 3″ and above, install the Steering Shaft Relocation Bracket (if included) to prevent the steering shaft from binding or popping out of the splines at full droop.
Crucial Torque Specs Chart (Jeep FSM Reference)
Do not guess your torque specs. Under-tightening leads to component failure; over-tightening destroys bushings. Always refer to the Jeep Factory Service Manual (FSM) and Teraflex specific instructions.
| Component | Torque Spec (lb-ft) | Notes |
|---|---|---|
| Front Lower Control Arm (Frame side) | 125 lb-ft | Torque at ride height! |
| Front Upper Control Arm (Frame side) | 125 lb-ft | Torque at ride height! |
| Rear Lower Control Arm (Frame side) | 125 lb-ft | Torque at ride height! |
| Rear Upper Control Arm (Frame side) | 125 lb-ft | Torque at ride height! |
| Front/Rear Track Bar (Frame & Axle) | 125 lb-ft | Ensure axle is centered before final torque. |
| Sway Bar Links | 55 lb-ft | |
| Shock Absorber Lower Bolt | 75 lb-ft | |
| Shock Absorber Upper Bolt | 35 lb-ft | |
| Wheel Lug Nuts | 130 lb-ft | Re-torque after 50 miles. |
Crucial Rule: Always tighten control arm bolts with the vehicle’s weight on the tires (ride height). If you torque them while the axle is hanging, the rubber bushings will tear prematurely once the vehicle is lowered.
Post-Installation: Alignment, Electronics & Drivetrain
The physical installation is only half the battle. The post-installation checks are what separate a safe, great-driving Jeep from a dangerous one.
Steering Geometry & Drag Link Adjustment
After a lift, your steering wheel will likely be off-center. Do not adjust the tie rod. On a JK, you must adjust the Drag Link (the bar connecting the track bar to the steering knuckle) to center the steering wheel without altering the toe alignment.
Electronics, Sensors & Headlight Calibration
- Headlight Alignment: Your Jeep’s nose is now pointing at the sky. Use a wall and a tape measure to drop the headlight aim down 2-3 inches to avoid blinding oncoming traffic.
- Park Assist / Sensors: If your JK has factory parking sensors, the change in ride height may throw a “Park Assist Disabled” code. This usually requires a dealer or a high-end OBD2 scanner (like AlfaOBD or Tazer) to recalibrate the sensor angles.
- ESBD Recalibration: Drive the vehicle at low speeds and actuate the sway bar disconnect several times to allow the module to learn the new link lengths.
Drivetrain: Pinion Angle, CV Joints & SYE
- Pinion Angle & Driveshaft Vibration: If you experience a violent vibration under acceleration, your rear pinion angle is incorrect. Adjust the rear upper control arm (lengthen or shorten in small increments) to point the pinion slightly up toward the transfer case.
- CV Joint Binding: Inspect the front axle CV joints at full stuff and full droop. If you hear clicking or feel binding, you may need to install aftermarket high-angle CVs or limit strap setups.
- Slip Yoke Eliminator (SYE): If you installed a 3.5″ or larger lift and experience severe rear driveshaft vibration that pinion angle adjustments won’t fix, you likely need an SYE and a custom rear driveshaft to correct the transfer case output angle.
- Fender Trimming: If you are running 35-inch tires on a 3.5″+ lift, you may need to perform a Pinch Weld Modification or fender trimming to prevent rubbing at full compression.
Common Mistakes to Avoid
- Ignoring Brake Line Stretch: Skipping extended brake lines on a 3″+ lift is a recipe for blown brake lines and total brake failure off-road.
- Torquing Bushings at Full Droop: As mentioned in the torque chart, failing to torque control arms at “ride height” will result in torn bushings within a few hundred miles.
- Using the Tie Rod for Steering Alignment: Adjusting the tie rod to center the steering wheel will ruin your toe-in setting, leading to rapid tire wear and potential death wobble. Always adjust the drag link.
- Skipping the Post-Lift Alignment: A lift drastically changes caster and camber. Get a professional 4×4 alignment within the first 100 miles.
Frequently Asked Questions About Jeep Wrangler JK Teraflex Lift Install Guide
How long does it take to install a Teraflex lift on a JK?
For a competent DIYer with the right tools, a 2.5″ kit takes about 4-6 hours. A 3.5″ to 4.5″ kit with geometry corrections and track bars will take 8-12 hours.
Do I need an alignment after installing a lift kit?
Absolutely. A lift changes your caster, camber, and toe. Driving without an alignment will cause severe tire wear and can trigger steering issues like death wobble.
Can I install a Teraflex lift in my driveway?
Yes, provided you have a flat, level surface, high-quality jack stands, and a comprehensive metric/SAE tool set. However, if you lack experience with suspension geometry, a professional shop is recommended.
What size tires can I run on a 2.5″ or 3.5″ Teraflex lift without trimming?
A 2.5″ lift typically clears 33×12.50 tires with minor rubbing at full stuff. A 3.5″ lift can usually clear 35×12.50 tires, though minor pinch-weld modification or fender trimming may be required at full compression.
Will this lift kit cause a “death wobble” on my JK?
A properly installed Teraflex kit will not cause death wobble. In fact, Teraflex components are designed to tighten up the front end. Death wobble is usually caused by worn factory track bar bushings, bad ball joints, or improper torque specs during installation.
Conclusion
Completing this Jeep Wrangler JK Teraflex Lift Install Guide transforms your JK from a stock SUV into a capable, head-turning off-road machine. By paying close attention to the torque specs, respecting the electronic quirks like the ESBD, and ensuring your drivetrain geometry is dialed in, you ensure your Jeep rides as good as it looks.
What lift kit are you running on your JK, and what size tires are you rocking? Let us know in the comments below, or share your build progress in our community forum!

“Cars aren’t just machines. They’re freedom, memory, and a little bit of grease under your fingernails.”
I’m Theodore Roosevelt—though my friends just call me “Ted” (and no, I’m not related to the president, though I do share his love for adventure). I grew up in Detroit in the 1970s, back when the city was still the heart of the American auto industry. My first love was a rusted-out 1967 Mustang my father and I rebuilt in our garage when I was fifteen. That project taught me that cars have souls. After spending twenty years as a mechanic and another ten writing for magazines, I started this blog to help everyday drivers and weekend wrenchers feel confident under the hood. Whether you’re restoring a classic or just trying to keep your daily driver alive for one more winter, I’m here to help you get there.