
If your Jeep Cherokee XJ has started rattling on a cold start, idling roughly, or throwing a random misfire code, there’s a good chance your timing chain is stretched and ready to fail. The good news: replacing the timing chain on a Jeep XJ is one of the most well-documented DIY jobs in the Jeep community, and with the right tools and a free afternoon (or two), you can do it in your own garage for a fraction of what a shop would charge.
This guide walks you through everything from spotting the early warning signs, to the exact tools you’ll need, to a full step-by-step install with torque specs, so you can get your XJ running smooth and quiet again.
Quick answer: A Jeep XJ timing chain replacement typically takes 4–8 hours for an experienced mechanic, or a full weekend for a first-time DIYer. Expect to spend $80–$250 on parts if you do it yourself, versus $500–$900+ at a shop. Difficulty level: Intermediate to Advanced.
In this guide:
- Signs your timing chain needs replacing
- How to check chain deflection without removing the cover
- Complete tools and parts list
- Parts you should replace at the same time
- Cost breakdown (DIY vs. professional)
- Safety precautions
- Full step-by-step install instructions
- Common mistakes to avoid
- Warranty and legal considerations by country
- FAQs
Signs Your Jeep XJ Timing Chain Needs Replacement
The 4.0L inline-six in the Jeep XJ has a reputation as one of the most durable engines Chrysler ever built, and its timing chain is no exception many owners report chains lasting well past 150,000 miles. But no timing chain lasts forever, and catching the warning signs early can save you from a much more expensive repair down the road.
Rattling or Whining Noise on Cold Start
The most common symptom is a metallic rattling or slapping noise coming from the front of the engine, most noticeable for the first few seconds after starting the engine cold. This happens because oil pressure hasn’t fully built up yet, so the chain has more slack until the tensioner catches up. If the noise disappears once the engine warms up, that’s a strong sign the chain has stretched beyond its normal tolerance.
Check Engine Light and Diagnostic Codes
A worn timing chain throws off the relationship between the crankshaft and camshaft, which your Jeep’s computer will notice. Watch for these codes:
- P0016 — Crankshaft/Camshaft Position Correlation
- P0017 — Crankshaft/Camshaft Position Correlation (Bank 1 Sensor B)
- P0341 — Camshaft Position Sensor Circuit Range/Performance
None of these codes are exclusive to a timing chain problem, but if you’re also hearing a rattle, they’re a strong confirmation.
Rough Idle and Mid-Throttle Flat Spot
A stretched chain can cause the ignition and fuel injection timing to drift slightly out of spec, which often shows up as a rough idle, hesitation, or a “flat” feeling under moderate acceleration — even though the engine may still run fine at idle or wide-open throttle. Owners who’ve replaced a badly worn chain often describe the engine feeling noticeably smoother and more responsive afterward, sometimes even needing a day or two of driving for the computer to “relearn” optimal timing.
Is There a Fixed Mileage Interval for Replacement?
Unlike a timing belt, which most manufacturers specify for replacement at a set mileage, there’s no single official interval for the XJ’s timing chain. Real-world experience from the Jeep community varies widely:
- Some owners report chains failing as early as 75,000–100,000 miles, especially with poor oil maintenance
- Many go 150,000–200,000 miles with no issues
- A well-maintained engine (regular oil changes, no overheating) can push past 250,000–300,000 miles before the chain needs attention
Rather than replacing on a mileage schedule, the recommended approach is to inspect the chain’s condition, either by listening for symptoms or physically checking deflection (see the next section), and replace it based on actual wear rather than guesswork.
How to Check Timing Chain Deflection Without Removing the Cover
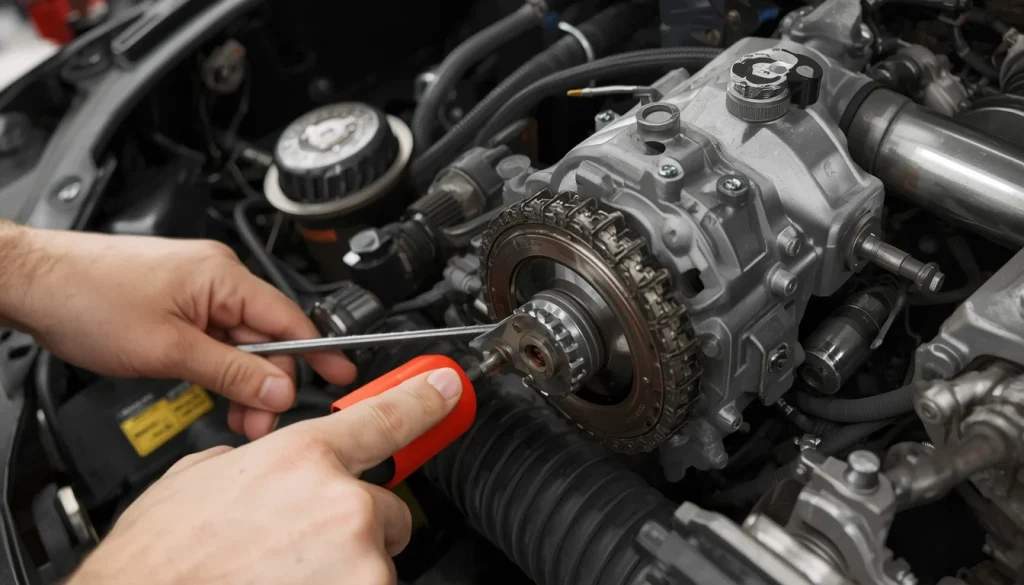
Before you commit to tearing into the front of the engine, it’s worth doing a quick deflection check to confirm the chain actually needs replacing. This method doesn’t require removing the timing cover.
The Distributor Cap Method
- Remove the distributor cap so you can see the rotor and distributor housing.
- Using a paint marker or grease pencil, mark a reference point on the distributor housing where the edge of the rotor currently lines up.
- Turn the crankshaft (via the harmonic balancer bolt) slowly in one direction until all slack is out of the chain, then note the rotor’s position.
- Turn the crankshaft in the opposite direction until the rotor just begins to move again. Stop as soon as you see movement.
- Measure the distance the rotor traveled between your two marks. This gap represents the chain’s slack.
What the Factory Service Manual Says
According to Jeep’s factory service specifications, if chain deflection exceeds 12.7mm (1/2 inch), the chain should be replaced. Anything under that is generally considered within acceptable wear.
If you don’t have a distributor (later OBD-II XJs use a different ignition setup) or prefer a more direct check, you can also inspect deflection visually once the timing cover is off, using a straightedge along the longest span of chain deflection of more than about 1/4 inch (6mm) on an open engine is typically the threshold worth acting on.
Essential Tools & Parts List
Know Your Engine First: 2.5L vs. 4.0L
The XJ was sold with two four-cylinder-adjacent… actually, two engine options relevant here: the 2.5L four-cylinder and the 4.0L inline-six. Both engines share the same bottom-end design, so the removal and installation procedure is nearly identical between them. However, the timing chain kits themselves are different:
| Engine | Chain Type | Notes |
|---|---|---|
| 2.5L | Single-link roller chain | Shorter chain, smaller sprocket set |
| 4.0L | Single-link chain (double-roller kits available aftermarket) | Longer chain, 48-tooth cam sprocket, 24-tooth crank sprocket |
Always confirm your engine size before ordering a kit — a 2.5L kit will not fit a 4.0L, and vice versa.
Tools You’ll Need
| Tool | Purpose |
|---|---|
| Socket set (metric, 10mm–19mm) | Removing accessory brackets, radiator, covers |
| Harmonic balancer puller | Removing the vibration damper without damaging the crank |
| Harmonic balancer installer | Pressing the new damper back on evenly |
| Torque wrench (ft-lb range) | Crankshaft bolt and larger fasteners |
| Torque wrench (in-lb range) | Timing cover bolts (easy to over-torque and crack) |
| Large breaker bar | Breaking the crankshaft bolt free |
| Seal installer | Seating the new front crank seal squarely |
| Gasket scraper | Cleaning old gasket material off mating surfaces |
| Wire brush | Cleaning bolt threads and surfaces |
| Drain pan | Catching coolant and oil |
| Factory Service Manual (FSM) | Torque specs and reference diagrams |
Pro Tip: Rent Specialty Tools for Free
Tools like the harmonic balancer puller and installer are expensive to buy for a one-time job. In the USA, most major auto parts retailers such as AutoZone and Advance Auto Parts offer a free tool loan/rental program — you pay a refundable deposit, use the tool, and get your money back when you return it. This can save you $80–150 on specialty tools you’ll likely only use once.
Timing Chain Kit Components Explained
A complete timing chain kit typically includes:
- Timing chain — connects the crankshaft and camshaft sprockets
- Camshaft sprocket — 48-tooth gear on the 4.0L
- Crankshaft sprocket — 24-tooth gear on the 4.0L
- Chain guide/damper — a rubber or nylon guide that keeps the chain from slapping against the timing cover
- Tensioner/snubber — maintains proper chain tension as it wears; some kits include an updated snubber design to address factory weak points
Single-Roller vs. Double-Roller Chain: Which Should You Buy?
| Type | Pros | Cons | Best For |
|---|---|---|---|
| Single-roller (stock-style) | Cheaper, factory-matched | Shorter lifespan under heavy use | Daily drivers, stock engines |
| Double-roller | Stronger, more durable, better for towing/off-road stress | More expensive ($20–40 more) | Modified engines, heavy towing, high-mileage rebuilds |
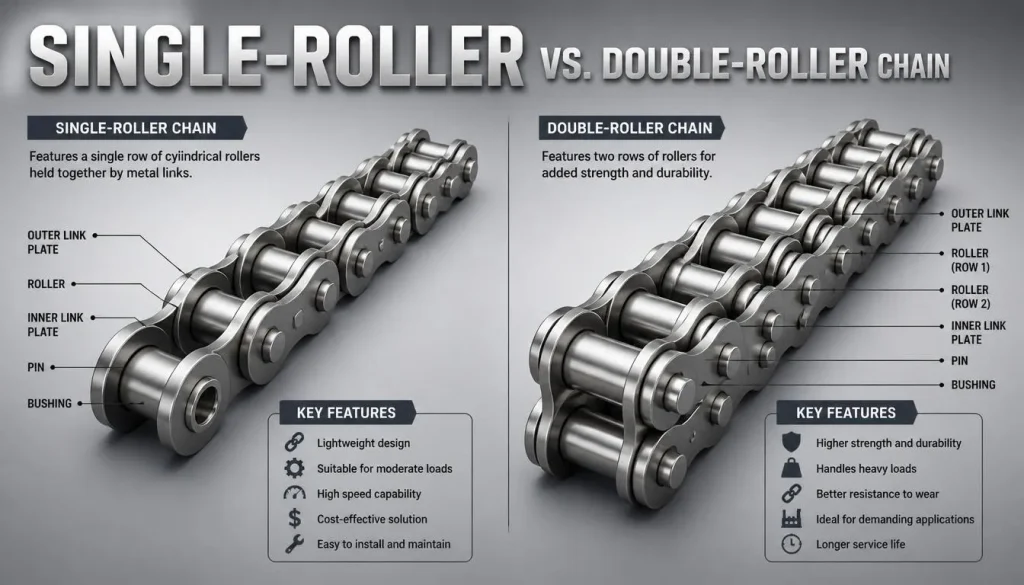
For a stock daily-driven XJ, a quality single-roller kit is usually sufficient. If you tow, wheel hard, or are doing a full engine rebuild, the extra cost of a double-roller kit is worth it for the added durability.
OEM vs. Aftermarket Brands
| Brand | Type | Price Range (USD) | Notes |
|---|---|---|---|
| Mopar (OEM) | Factory-matched | $$$ | Exact fit, higher cost |
| Cloyes | Aftermarket | $$ | Popular, reliable reputation among XJ owners |
| Melling | Aftermarket | $$ | Budget-friendly, widely available |
Shop Supplies
- RTV silicone sealant (black, high-temp)
- New engine oil and filter
- New coolant (if you’re draining the radiator)
- Shop rags and brake cleaner for degreasing
Parts You Should Replace While You’re In There
Since you’re already paying for the labor (your own time) to access the front of the engine, it makes sense to replace a few other wear items at the same time rather than doing this job twice.
Water Pump
The water pump sits right behind the timing components and shares the same drive belt system. If yours has any play in the bearing or shows signs of leaking, now is the time to swap it.
Timing Cover Gasket
Even if your old gasket looks fine, timing covers on XJs are notorious for developing slow oil leaks over time. A new gasket (plus a bead of RTV at the corners) is cheap insurance against a future leak.
Front Crankshaft Seal
This small seal takes a lot of abuse from crankshaft rotation and heat cycling. Since you’ll already have the harmonic balancer off, replacing it now costs you almost nothing extra in labor.
Cost Breakdown: DIY vs. Professional Mechanic
DIY Costs (Parts Only)
| Item | Estimated Cost (USD) |
|---|---|
| Timing chain kit (chain + gears + guide) | $40–100 |
| Water pump | $30–70 |
| Timing cover gasket + crank seal | $15–30 |
| Shop supplies (RTV, oil, filter, coolant) | $30–50 |
| Total DIY Parts Cost | $115–250 |
Tool rental (if using a free loan program) can bring your total tool cost close to $0, aside from a refundable deposit.
Professional Labor Cost by Region
| Region | Estimated Labor Cost | Notes |
|---|---|---|
| USA | $400–700 | Varies by shop, higher in metro areas |
| UK | £250–450 | VAT included at most independent garages |
| Canada | CAD $500–850 | Similar to US pricing, higher in Ontario/BC |
| Australia | AUD $600–950 | Labor rates tend to run higher than US/UK |
Total professional cost (parts + labor) typically lands between $500 and $1,000+ USD equivalent, depending on region and whether companion parts (water pump, gasket, seal) are included.
Safety Precautions Before You Start
- Disconnect the battery before starting any work — you’ll be working near the crankshaft and accessory belts, and an accidental start could cause serious injury.
- Let the engine cool completely before draining coolant; a hot cooling system is pressurized and can cause burns.
- Use proper jack stands, not just a jack, if you need to get underneath the vehicle at any point.
- Wear safety glasses when using the breaker bar on the crankshaft bolt — it’s under significant torque and can slip.
- Keep a fire extinguisher nearby when working around fuel lines and electrical connections.
Step-By-Step Timing Chain Replacement Guide
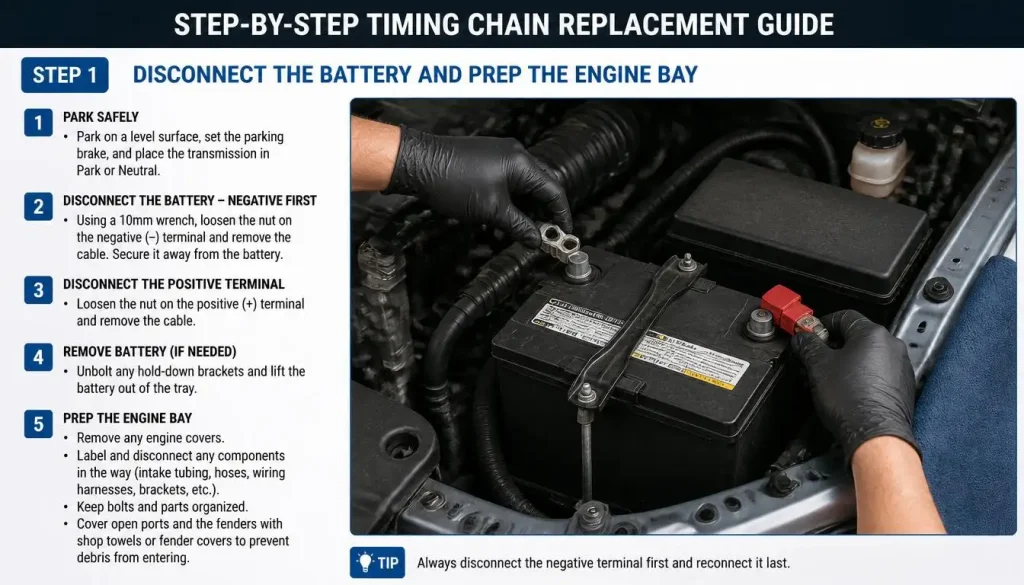
Step 1: Disconnect the Battery and Prep the Engine Bay
Disconnect the negative battery terminal first. Clear the engine bay of any loose items and lay out your tools and new parts so you can find them quickly during reassembly.
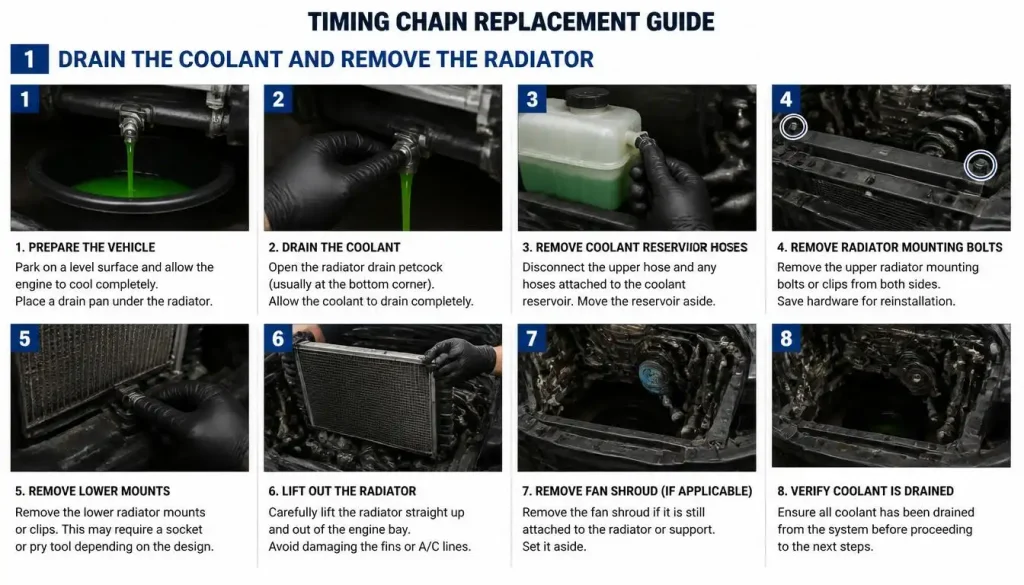
Step 2: Drain the Coolant and Remove the Radiator
Place a drain pan under the radiator petcock and drain the coolant completely. Disconnect the upper and lower radiator hoses, then remove the radiator mounting bolts (typically four 10mm bolts) and lift the radiator out. This gives you the clearance needed to work on the timing cover.
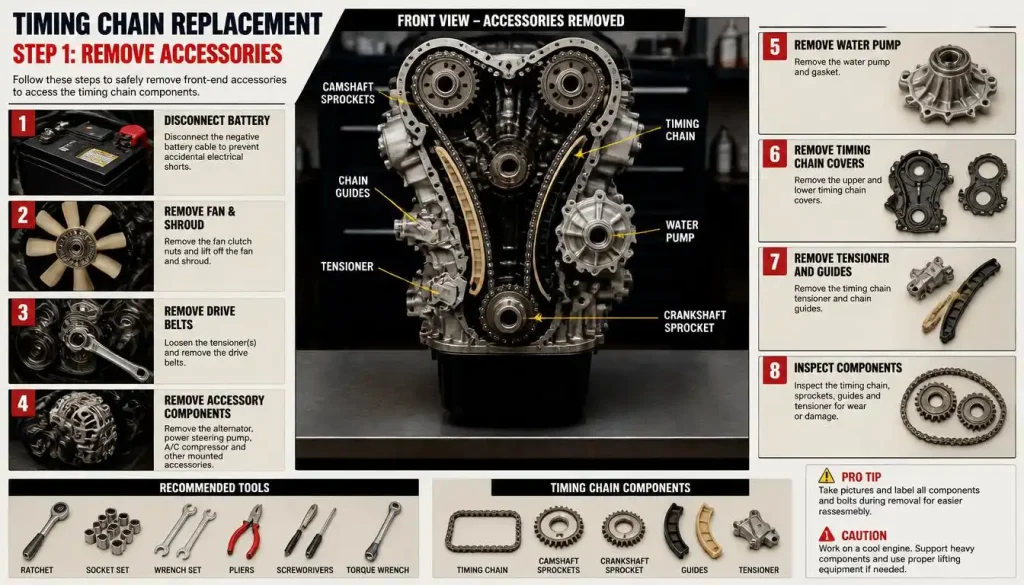
Step 3: Remove Accessories
Remove the serpentine belt by using a breaker bar on the tensioner pulley to relieve tension, then slip the belt off. Remove the alternator bracket, as the belt tensioner is often mounted to it and blocks access to the timing cover bolts.
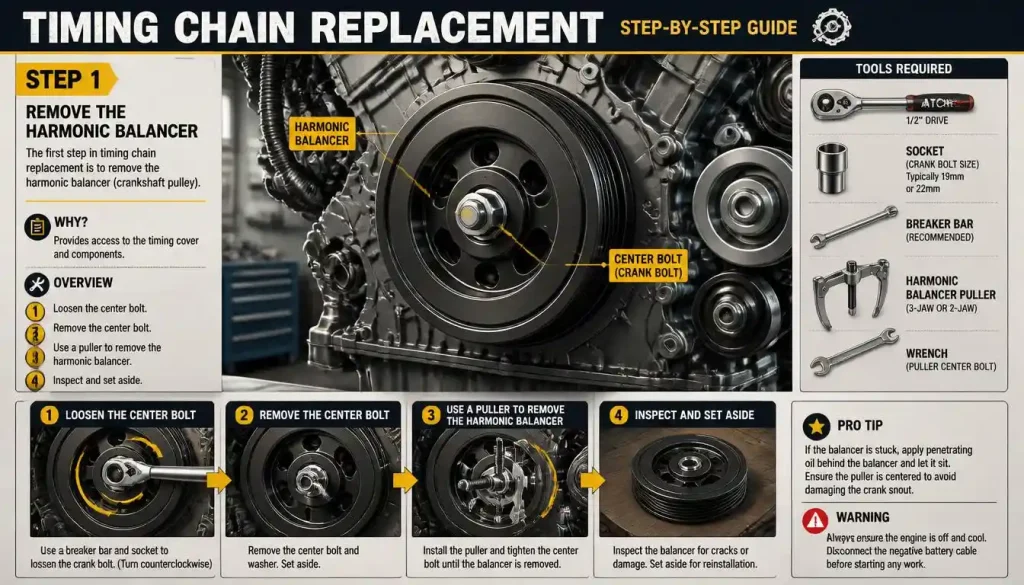
Step 4: Remove the Harmonic Balancer
Use a large breaker bar (or put the transmission in gear with the parking brake engaged, if manual) to break the crankshaft bolt free. Once removed, use a harmonic balancer puller to draw the damper off the crankshaft nose never hammer or pry it off, as this can damage the crank.
Step 5: Remove the Timing Cover
Remove the bolts holding the timing cover to the block (note there are usually two different bolt sizes — keep them separated). Gently pry the cover free if it’s stuck, being careful not to gouge the sealing surfaces.
Step 6: Align the Timing Marks
Before removing anything else, rotate the crankshaft until the timing marks on the camshaft sprocket (48-tooth) and crankshaft sprocket (24-tooth) line up according to the factory alignment diagram. This step is critical skipping it is one of the most common causes of a botched install.
Step 7: Remove the Old Chain, Gears, and Tensioner
Remove the camshaft bolt and washer, then slide the camshaft sprocket and chain off together without turning the crankshaft. Remove the key from the crankshaft nose (easy to forget!), then pull the crankshaft sprocket off. Remove the tensioner/snubber assembly.
Step 8: Install the New Timing Chain Kit
Install the new crankshaft sprocket (with key), then loop the new chain around both the crankshaft and camshaft sprockets before sliding the camshaft sprocket into place — this keeps the chain properly seated on both gears simultaneously. Install the new tensioner/snubber and chain guide.
Torque reference (4.0L, verify against your FSM):
| Fastener | Torque Spec |
|---|---|
| Camshaft sprocket bolt | ~16mm socket, torque to FSM spec |
| Timing cover bolts (1/4″) | 7 Nm (60 in-lb) |
| Timing cover bolts (5/16″) | 22 Nm (192 in-lb) |
| Oil pan-to-cover bolts | 9.5 Nm (84 in-lb) |
| Crankshaft bolt | ~108 Nm (80 ft-lb) |
Step 9: Verify Timing Alignment
Before closing everything up, double-check that your timing marks are still perfectly aligned. This is your last chance to catch a mistake before it’s sealed inside the engine.
Step 10: Reinstall the Timing Cover, Gasket, and Crank Seal
Clean both mating surfaces thoroughly. Apply RTV sealant at the corners of the new gasket where it meets the block, then install the cover. Using your seal installer, press the new front crank seal squarely into place.
Step 11: Reinstall the Radiator, Accessories, and Harmonic Balancer
Reinstall the harmonic balancer using your installer tool (threading it onto the crank and drawing it on evenly), torque the crankshaft bolt to spec, then reinstall the alternator bracket, serpentine belt, and radiator.
Step 12: Refill Fluids, Reconnect the Battery, and Test Start
Refill the cooling system with fresh coolant, check the oil level, and reconnect the battery. Start the engine and let it idle while checking for leaks around the timing cover and radiator hoses. Listen closely — the rattling noise should be gone.
Common Mistakes to Avoid
- Misaligned timing marks — Even a single tooth off will throw off valve timing and can cause serious drivability issues or engine damage.
- Over-torquing timing cover bolts — These are often smaller fasteners threaded into aluminum; over-tightening can strip threads or crack the cover.
- Reusing the old tensioner/snubber or gasket — These are wear items; reusing them defeats the purpose of the job and risks a repeat repair.
- Forgetting to remove the crankshaft key — A surprisingly common mistake that can make the crankshaft sprocket seem impossible to remove, leading some DIYers to force it and damage the sprocket or crank snout.
How Long Does a Jeep XJ Timing Chain Replacement Take?
For an experienced mechanic, this job typically takes 4–8 hours. For a first-time DIYer working solo, it’s realistic to plan for a full day or a weekend, especially if you’re also replacing companion parts like the water pump and taking your time to avoid mistakes.
Warranty & Legal Considerations
USA
Aftermarket timing chain kits typically come with a limited warranty (often 12 months) covering defects in materials or workmanship, this usually does not cover installation labor if the part fails after a DIY install. Under right-to-repair principles, you’re free to source and install your own parts without voiding any remaining factory powertrain warranty, provided the failure isn’t caused by improper installation.
UK
If you’re planning to keep the vehicle road-legal, a poorly executed timing chain repair that leads to engine damage or a check engine light can affect your MOT pass, particularly if it triggers emissions-related fault codes. It’s worth having the work checked or test-driven before your next MOT is due.
Canada
Provincial safety inspection standards vary, but a rough-running engine or illuminated warning light resulting from a failed DIY repair can be flagged during a safety inspection in provinces that require one for registration transfers or after significant repairs.
Australia
Similar to the UK, a roadworthy certificate (RWC) inspection can be affected by a check engine light or drivability issue stemming from an incorrect timing chain install. If you’re selling or re-registering the vehicle, make sure the repair is solid before booking your RWC inspection.
When to Call a Professional Instead
If you don’t have access to a garage, the specialty tools (even with rental options), or you’re not comfortable working with torque specs and precise timing alignment, this is a job worth leaving to a professional.
A misaligned timing chain can cause valve-to-piston contact on an interference setup or, at minimum, a rough-running engine that’s expensive to diagnose after the fact. If in doubt, get a quote from a trusted independent Jeep mechanic rather than risking a costly mistake.
FAQs About Jeep XJ Timing Chain Install
How much does it cost to replace a timing chain on a Jeep XJ 4.0L?
DIY parts typically run $115–250. A professional shop will usually charge $500–$1,000+ total depending on your region and whether companion parts like the water pump are included.
Can I drive with a bad timing chain?
You can drive short distances, but a badly stretched or skipping timing chain risks throwing off valve timing entirely, which can cause serious engine damage. It’s not a repair to put off once you’re hearing consistent rattling or seeing related trouble codes.
What year XJ models are most prone to timing chain failure?
Timing chain wear is more closely tied to mileage and maintenance history than model year specifically. However, high-mileage examples from any year especially those with inconsistent oil change intervals, are more likely to need this repair.
Is a timing chain the same as a timing belt?
No. A timing chain is a metal chain located inside the engine and lubricated by engine oil, designed to last much longer than a rubber timing belt, which sits outside the engine and requires replacement on a fixed mileage schedule. The XJ uses a timing chain, not a belt.
How often should the XJ timing chain be replaced?
There’s no fixed interval inspect based on symptoms (rattling, codes) or a physical deflection check rather than mileage alone. Many chains last well past 150,000 miles with good maintenance.
Is it normal for my Jeep to run rough right after a timing chain replacement?
Some owners notice a brief adjustment period after the repair, particularly on older engines with non-resettable computers, as the engine’s control module relearns optimal timing under the new chain’s tighter tolerances. This typically smooths out within a day or two of normal driving. If roughness persists beyond that, double-check your timing mark alignment.
What’s the difference between the 2.5L and 4.0L timing chain kit?
The two engines share the same bottom-end design, but the 2.5L uses a shorter chain and smaller sprocket set than the 4.0L. The kits are not interchangeable, always confirm your engine size before ordering parts.
Conclusion
Replacing the timing chain on a Jeep XJ is a job well within reach of a confident home mechanic, as long as you take your time with the timing mark alignment and don’t skip the companion parts while you’re already in there. With the right tools, a clear step-by-step process, and a bit of patience, you can knock this repair out in a weekend and save yourself several hundred dollars compared to shop labor.

“Cars aren’t just machines. They’re freedom, memory, and a little bit of grease under your fingernails.”
I’m Theodore Roosevelt—though my friends just call me “Ted” (and no, I’m not related to the president, though I do share his love for adventure). I grew up in Detroit in the 1970s, back when the city was still the heart of the American auto industry. My first love was a rusted-out 1967 Mustang my father and I rebuilt in our garage when I was fifteen. That project taught me that cars have souls. After spending twenty years as a mechanic and another ten writing for magazines, I started this blog to help everyday drivers and weekend wrenchers feel confident under the hood. Whether you’re restoring a classic or just trying to keep your daily driver alive for one more winter, I’m here to help you get there.