You notice one daytime running light looks dimmer than the other. Maybe it flickered once, and now it’s dead. Fixing it matters for visibility and passing inspection.
Learning how to change daytime running lights 2013 Jeep Grand Cherokee isn’t complicated, but getting the right bulb type is critical because your trim determines whether you’re dealing with a simple twist-out halogen or a sealed LED module.
Per SAE J584 standards, the DRL circuit draws about 65 watts from the 12-volt system for halogen units. That constant on-time means these bulbs run hotter and wear faster than your main headlights. Getting a replacement that matches your exact setup prevents a wasted trip to the auto parts store and avoids frustration over buying the wrong part for a $25 fix.
Quick Answer
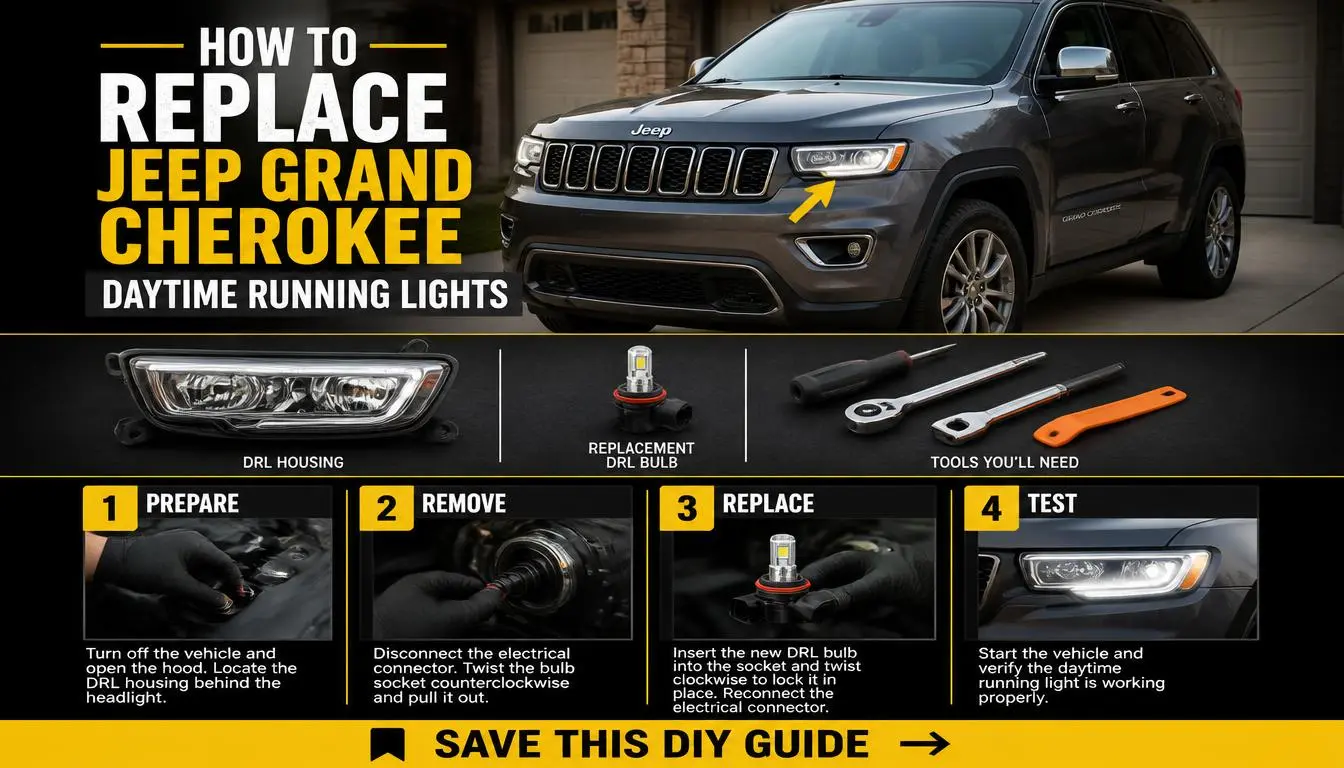
To change the daytime running lights on a 2013 Jeep Grand Cherokee, start by identifying your trim level. The Base, Limited, and Trailhawk models use a standard 9005 halogen bulb that twists out of a rear-access socket. The Overland and Summit trims have a sealed LED module that requires headlamp assembly removal.
You need a T20 Torx bit, an 8 mm socket, a microfiber cloth, and a replacement bulb matching your trim. Disconnect the negative battery terminal before starting. Twist the socket counterclockwise about a quarter turn to release.
Pull the old bulb straight out. Install the new bulb without touching the glass. Reconnect everything and test both lights.
A proper replacement costs between $10 and $30 for halogen bulbs. It takes about 15 to 30 minutes with basic tools. If you skip the rubber dust boot seal check, moisture damages your new bulb within weeks.
This process shares similarities with how to change the tail light bulb on earlier Grand Cherokee models, especially around accessing rear-mounted lighting assemblies through the wheel well or engine bay.
What’s Inside Your Headlamp: Halogen vs. Sealed LED DRL Systems
Your 2013 Grand Cherokee did not come with one DRL setup. Jeep split the lighting hardware across trim levels, and mixing up the types wastes money. Understanding what sits inside your headlamp housing before you buy anything saves headaches down the road.
The Halogen 9005 Setup (Base, Limited, Trailhawk)
Most 2013 Grand Cherokees use a conventional halogen bulb for the daytime running light function. The bulb type is 9005, also known as HS1. It mounts into a socket at the rear of the headlamp assembly.
The socket threads into a rubber dust boot sealing the housing opening. You access everything from behind the headlamp without removing the entire assembly.
The 9005 bulb contains a tungsten filament inside a small quartz glass envelope filled with inert gas. When 12 volts passes through the filament, it glows white-hot and produces light. The two metal prongs on the base connect to the vehicle wiring harness.
A plastic collar on the bulb base locks into the socket. The whole unit pulls straight out once unlocked.
This system is straightforward. The parts cost is low. The replacement is quick.
The downside is lifespan. Halogen DRL bulbs typically last between 1,000 and 2,000 hours of operation. Since DRLs run every time the engine is on, you may replace them once or twice a year depending on driving habits.

Image source: Web (Bing) / sciencenotes.org (Web image (fair-use with source credit))
The Sealed LED Module Setup (Overland, Summit)
Higher trims like the Overland and Summit received a different configuration. Instead of a removable bulb, Jeep installed a sealed LED DRL module directly into the headlamp assembly. The LEDs mount on a rigid circuit board behind a diffuser lens.
There is no socket to twist. There is no bulb to pull out.
If the DRL fails on one of these trims, you replace the entire LED module or the complete headlamp assembly. Some modules are serviceable separately. Others require dropping the whole housing from the vehicle.
The wiring connects through a single multi-pin harness snapping into the back of the assembly.
LED modules offer significant advantages over halogen. They draw less power, typically 20 to 30 watts total for both sides. They last significantly longer, often rated around 50,000 hours.
The light output is brighter and whiter, closer to daylight spectrum. The trade-off is cost and complexity. A replacement LED module runs $150 to $400.
A full headlamp assembly runs $200 to $600 per side. Installation usually involves removing the front bumper or at minimum lowering the headlamp bracket.
Identifying What You Have Before You Buy Anything
Check your build sheet or window sticker first. It lists the equipment codes, including lighting package options. If your Grand Cherokee has code M9H or similar daytime running lamp with high-intensity discharge, double-check whether that refers to the main beams or the DRL strip only.
Look through the front grille at the headlamp housing. Hold a flashlight behind the clear lens and peer in. If you see a visible glass bulb with a metal base and two wire terminals, you have halogen.
If you see a flat black rectangular plate with small yellowish LED chips arranged in a pattern and no glass element, you have the sealed LED module.
You can also check the existing bulb directly. Pop the dust boot and try to twist the socket. If it turns freely and a bulb comes out, it’s halogen.
If the socket is bolted down or welded into the housing with no turning motion, it’s the LED setup.
Tools, Parts, and Preparation: What You Actually Need
Image source: Web (Bing) / artofit.org (Web image (fair-use with source credit))
This job does not require a full mechanic’s toolkit. But it does require specific items, and bringing the wrong ones to the garage door is frustrating. Here is what you need and why each item matters.
Essential Tools
| Tool | Size | Purpose |
|---|---|---|
| Torx bit set | T15, T20, T25 | Remove access panel screws and headlamp mounting bolts |
| Socket ratchet | 8 mm, 10 mm | Loosen retaining bolts on the headlamp assembly |
| Socket extensions | 3-inch and 6-inch | Reach bolts in tight spaces behind the engine |
| Trim removal tool | Plastic pry set | Release clips on the upper grille and access panels without scratching paint |
| Needle-nose pliers | Standard | Grip and bend small retention clips |
| Wire cutters or nippers | Standard | Cut zip ties securing the wiring loom |
| Flashlight or work light | LED preferred | Illuminate the dark workspace behind the headlamp |
| Magnetic tray or parts organizer | Small | Keep loose screws from falling into the engine bay |
Required Replacement Parts
- Halogen option: OEM Mopar 9005 bulb or branded equivalent from Philips, Sylvania, or Osram. Avoid unbranded bulbs from unknown manufacturers. The glass quality and gas fill matter for lifespan.
- LED upgrade option: Canbus-compatible 9005 LED replacement bulbs if you want to keep the halogen socket. Look for units with built-in drivers to prevent error codes.
- Sealed LED module: OEM or quality aftermarket module matched to your trim and side (left or right). Verify the part number matches your headlamp assembly code.
Materials You Should Not Skip
A microfiber cloth is essential for handling halogen bulbs. Skin contact transfers oils onto the quartz glass. Those oils create hot spots that cause the filament to burn out prematurely.
Always install halogen bulbs with a clean cloth or the packaging material.
Isopropyl alcohol is useful if you accidentally touch a halogen bulb. Dab a small amount on a lint-free wipe and gently clean the glass before installation. Let it dry completely.
Electrical contact cleaner helps if the bulb socket shows signs of corrosion. Corrosion on the terminal pins increases resistance and causes dimming or intermittent failure. A quick spray and wipe restores proper connection.
Vehicle Preparation Steps
Before you begin, make sure the engine is cool. Headlamp assemblies sit near the engine and get extremely hot during normal driving. Working on a warm assembly risks burns and makes components soft and hard to grip.
Park on a level surface. Set the parking brake. Turn off the ignition and remove the key or key fob from range.
Open the hood and secure it with the prop rod. On models with a power hood latch, verify the secondary latch releases fully.
Disconnect the negative battery cable before touching any electrical connectors. This prevents accidental shorts. The cable should have an 8 mm or 10 mm bolt at the terminal clamp.
Loosen it completely, then lift the clamp off the post. Secure the cable away from the terminal so it cannot spring back into contact.
If you recently performed an oil change or reset the Jeep Renegade oil change light, you likely already have the basics of working under the hood. The same cautious approach applies here. Handle connectors by the plastic housing, never by the wires themselves.
Step 1: Accessing the Rear of the Headlamp Assembly
The 2013 Grand Cherokee was designed with serviceability in mind. Jeep placed the DRL bulb socket at the rear of the headlamp housing, accessible from the engine compartment. You do not need to drop the front bumper or remove the radiator support.
Space is tight, and finding the entry point takes patience.
Locate the Headlamp Assembly From Behind
Stand in front of the vehicle with the hood open. Look down into the engine bay on the driver’s side. The headlamp assembly sits at the outer edge of the engine compartment, pressed against the fender and bumper support.
You are looking for the rear face of the assembly, the side facing toward the radiator and engine block.
Remove the engine cover if your model has one. Many 2013 Grand Cherokees ship with a plastic engine cover that snaps into place. Lift it straight up and set it aside.
This opens up significant workspace.
On some models, you also need to remove the upper grille. The grille holds by plastic clips along the top edge and possibly by a few Torx screws at the corners. Use the trim tool to gently pry each clip loose.
Work from the center outward. Do not force anything. The clips are plastic and crack easily under prying pressure.
Find the Rubber Dust Boot
Once you have a clear view of the back of the headlamp, look for a large circular rubber cover. This is the dust boot. It seals the opening where the bulb socket enters the headlamp housing.
The boot is typically 3 to 4 inches in diameter. It has a ribbed exterior for grip and a smooth interior mating against the housing.
The boot may sit flush against the housing or extend slightly beyond it. In some cases, a plastic access panel covers the boot entirely. This panel secures with two or three Torx screws, usually T20 size.
Remove those screws and set them in your magnetic tray.
If you see a wiring loom crossing in front of the access area, it holds by zip ties. Cut those zip ties with your nippers. Do not reuse them.
Have spare zip ties on hand for reassembly. Standard 4-inch black nylon ties work fine.
Clearing Additional Obstructions
Some engine configurations or optional equipment packages add components near the headlamp. The air intake duct routes close to the assembly. Radiator support braces limit your angle of approach.
Take a moment to map your path before applying force.
If a component blocks direct access to the dust boot, note its position and fasteners. You may need to loosen a clamp or remove a bracket. Document each step with photos on your phone if possible.
Reassembly goes much faster when you can reference what you removed.
Step 2: Removing the Old DRL Bulb
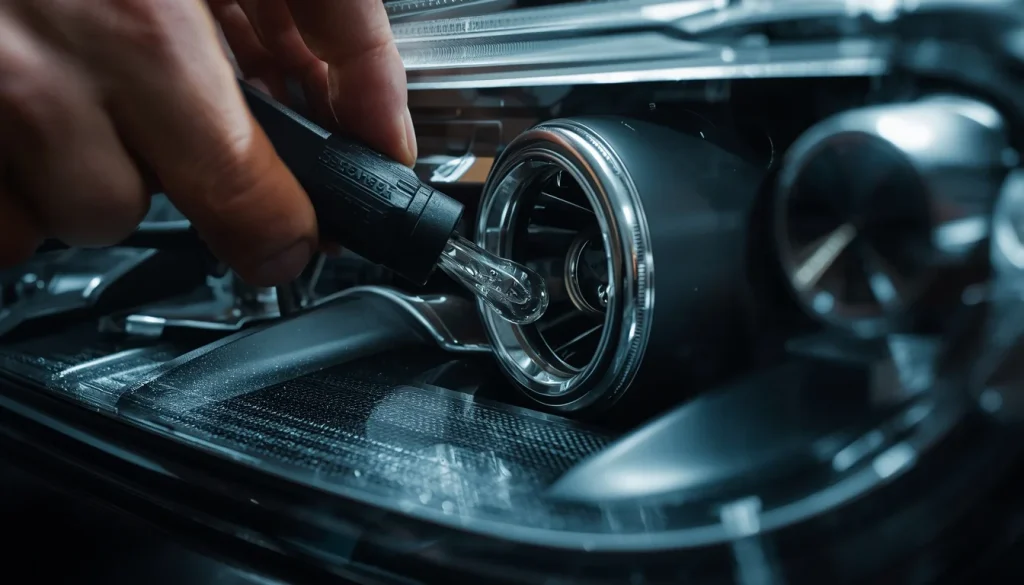
This is the core of the job. Get it right, and the replacement takes five minutes. Get it wrong, and you risk breaking clips, tearing the dust boot seal, or cracking the headlamp housing.
Move deliberately through each sub-step.
Disconnect the Electrical Connector
Reach behind the headlamp and locate the electrical connector plugged into the bulb socket. The connector is a small plastic block with two metal pins inside. A tab on the top or side locks it into place.
Press this tab down firmly with your thumb. While holding the tab, pull the connector straight off the socket pins.
Do not pull on the wires. Grip only the plastic connector housing. Yanking on the wires stretches and weakens the terminations.
Over time, this causes poor contact and intermittent DRL operation.
If the connector feels stuck, wobble it gently side to side while pulling. Do not use excessive force. The plastic tabs break easily if you lever them open aggressively.
A pair of needle-nose pliers helps grip the connector if your fingers cannot get purchase.
Twist and Unlock the Bulb Socket
Grasp the black plastic socket body, not the wires leading to it. The socket has a keyed shape allowing rotation in only one direction. Twist it counterclockwise about a quarter turn.
You feel and hear a soft click as the locking ridges disengage from the housing.
If the socket will not turn, check for hidden retainers. Some headlamp designs include a small metal clip or plastic tab locking the socket in place after the twist. Inspect the area around the socket base before applying more force.
Once unlocked, pull the socket straight back out of the headlamp housing. It slides free with moderate resistance from the dust boot seal. If it resists significantly, wiggle it gently while pulling.
The rubber seal compresses and expands. Do not yank, which tears the boot or stretches the housing mounting points.
Extract the Old Bulb
With the socket removed, the bulb is exposed. Grasp the bulb by its plastic base and pull it straight out of the socket. The 9005 bulb has two prongs seating into the socket contacts.
A small spring tension holds it in place. Straight pull force is all you need.
Inspect the old bulb. Note the orientation of the prongs and the position of the filaments. Halogen bulbs have a specific alignment mattering for beam pattern.
Remember this orientation before discarding the old bulb.
Examine the socket interior for signs of melting, corrosion, or debris. Dark discoloration on the plastic is normal from heat exposure. Green or white crust on the metal contacts indicates corrosion and may require cleaning with electrical contact cleaner.
If you spot a cracked or torn dust boot during removal, note it now. A compromised boot lets moisture and road grime into the headlamp. New bulbs fail fast in contaminated environments.
Consider replacing the boot if it shows any damage.
Step 3: Installing the New Bulb and Sealing the System
Installing the replacement requires attention to detail most DIYers rush through. Taking an extra two minutes here prevents callbacks and premature failures.
Handling the New Halogen Bulb Correctly
Pick up the new 9005 bulb by its plastic base only. Avoid any contact with the glass envelope. If you must touch the glass, wear clean nitrile gloves.
Even brief skin contact deposits oils carbonizing on the hot glass surface. Those oils create thermal stress points. The bulb may survive a few hours and then suddenly fail with a pop.
Place the bulb in the socket. Align the prongs with the socket contacts. Push straight in until the bulb seats firmly against the stop shoulder inside the socket.
Do not force it sideways. The prongs slide in smoothly. If resistance occurs, check the alignment.
Locking the Socket Back Into Place
Insert the socket assembly back into the headlamp housing. Push it in until the base sits flush against the housing opening. Then twist the socket clockwise about a quarter turn.
You feel and hear the lock engage. Give it a gentle tug to confirm it is secured.
A properly locked socket will not pull straight out. It requires a counterclockwise twist to release. If the socket still pulls free after twisting, the lock has not engaged.
Remove it again and retry. Forcing it into service risks vibration loosening it over time, causing arcing and overheating at the connection point.
Reconnecting the Electrical Connector
Align the connector with the socket pins. Push straight on until the locking tab clicks into place. Tug gently on the connector to verify it is seated.
A loose connector causes voltage drop and dim operation. The DRL may appear functional but burn brighter or dimmer than the opposite side.
Route the connector and wires neatly. Keep them away from any moving parts, hot surfaces, or sharp edges. The wiring follows its natural path without stretching or pinching.
Reseating the Rubber Dust Boot
This step is where most people cut corners. The rubber dust boot must form a complete seal against the headlamp housing. Moisture entering through a bad seal is the leading cause of premature headlamp failure and bulb burnout.
Clean the mating surface on both the boot and the housing with a damp cloth. Remove any dirt, grease, or old sealant residue. Let the surface dry completely.
Position the boot over the socket and push it evenly around the entire circumference. Use your palm to press the boot firmly against the housing. Work your way around the circle, pressing at regular intervals.
The boot sits flush with no gaps and no rolls or folds in the rubber.
If the boot has a metal or plastic retention ring, reinstall it and tighten it to the manufacturer’s specification. Most boots rely on friction fit alone. The tightness of the press matters more than any fastener.
Testing Before Full Reassembly
Reconnect the negative battery terminal. Tighten the clamp bolt to about 8 foot-pounds. Do not overtighten, which strips the terminal post threads.
Turn the ignition to the ON position. The DRLs illuminate immediately. Both lights glow at equal brightness.
Walk to the front of the vehicle and visually compare the two sides. One brighter than the other indicates a seating problem or a defective replacement bulb.
Leave the DRLs on for two minutes. Touch the headlamp housing near the bulb area. It should be warm, not scorching.
Excessive heat indicates a poor connection or incorrect bulb wattage.
After confirming function, turn the ignition OFF. Reinstall any access panels, grille components, or engine covers you removed. Replace all zip ties with fresh ones.
Secure the wiring loom in its original routing path.
Step 4: Halogen Upgrade vs. Full LED Assembly — Which Path Makes Sense?
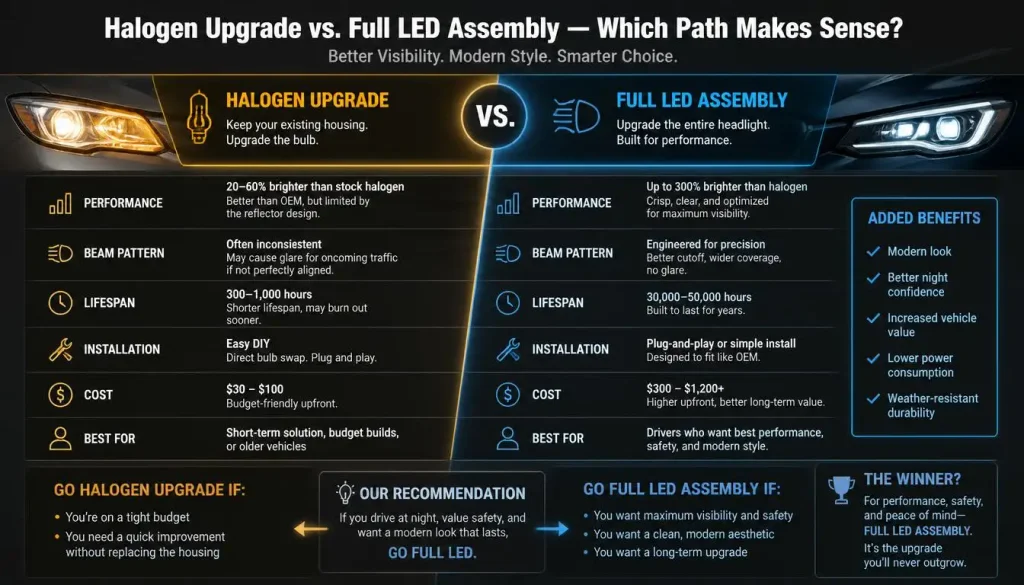
Once you replace the failed bulb, you face a choice. Stick with halogen, upgrade to LED replacement bulbs, or invest in a full LED headlamp assembly. Each path serves different priorities and budgets.
Staying With Halogen: The Safe Baseline
OEM-spec 9005 halogen bulbs cost $5 to $15 each. They produce approximately 1,500 lumens at 65 watts. The color temperature runs around 3,200 Kelvin, giving a warm white light cutting through rain and fog well.
Halogen bulbs are the simplest option. They drop in, twist on, and work. There are no compatibility questions, no error codes to troubleshoot, and no special tools required.
If your current setup works adequately and you prefer a proven solution, stay with halogen.
The limitation is lifespan and output. You replace halogen DRL bulbs every one to two years with regular driving. The light output is adequate but not impressive compared to modern LED technology.
Upgrading to LED 9005 Bulbs: Brighter Without the Hassle
LED 9005 replacement bulbs cost $40 to $120 per pair. They produce 1,800 to 2,500 lumens at roughly 30 watts. Color temperature options range from 4,300K to 6,500K.
The light is noticeably whiter and brighter than halogen.
These bulbs drop into the existing halogen socket. No wiring modifications are needed. Installation mirrors the halogen process exactly.
The main difference is that LED bulbs generate heat at the base rather than the glass, so ensure adequate airflow around the socket area.
However, LED bulbs in halogen reflector housings do not always produce an optimal beam pattern. The reflector was designed to focus light from a filament point source. An LED chip emits light from a different plane.
This mismatch causes scattered light, reduced road illumination, and glare for oncoming traffic. Quality LED bulbs with proper heatsink design minimize this issue, but it remains a factor to consider.
Some LED 9005 bulbs include built-in canbus drivers preventing dashboard error codes. Cheaper models without drivers trigger a DRL fault warning on the instrument cluster. Check product specifications before purchasing.
Replacing the Full LED Assembly: Maximum Performance
If you drive the Overland or Summit trim with a sealed LED module, your upgrade path is different. You cannot swap in an LED 9005 bulb because there is no socket. You replace either the LED module or the entire headlamp assembly.
Aftermarket LED headlamp assemblies for the WK2 Grand Cherokee cost $200 to $600 per side. Installation varies by model. Some bolt directly into the existing mounting points.
Others require trimming or modification to the bumper or support structure. Factory-style replacements with projector lenses provide the cleanest beam pattern and best road illumination.
Full assembly replacement is the right choice if your current housing shows significant oxidation, cracking, or interior moisture damage. A new assembly restores both function and appearance simultaneously.
| Upgrade Path | Cost Per Side | Installation Complexity | Lifespan | Beam Pattern Quality |
|---|---|---|---|---|
| OEM halogen 9005 replacement | $5–$15 | Minimal | 1,000–2,000 hours | Factory spec |
| Aftermarket LED 9005 bulb | $40–$120 | Minimal | 30,000–50,000 hours | Variable — depends on product |
| LED headlamp assembly replacement | $200–$600 | Moderate to high | 50,000+ hours | Excellent — optimized optics |
Choose the halogen route for budget and simplicity. Choose LED bulbs if you want a moderate brightness boost without major work. Choose a full assembly if you want maximum performance and are willing to invest the time and money.
Step 5: Common Mistakes That Ruin the Repair
Even competent DIYers make mistakes on this job. The consequences range from ruined bulbs to damaged components. Learning from others’ errors saves you time, money, and frustration.
Mistake 1: Touching the Halogen Glass
This is the single most common mistake. Skin oils transfer to the quartz glass instantly. Under operating temperatures of 600°F or higher, those oils carbonize and create dark spots.
The spots cause uneven heating of the glass. Thermal stress concentrates at those points. The bulb develops a micro-crack and fails, sometimes within hours.
Prevention: Always handle halogen bulbs by the plastic base. Use a clean microfiber cloth if you need extra grip. Keep bulbs in their original packaging until the moment of installation.
If you accidentally touch the glass, clean it thoroughly with isopropyl alcohol and let it dry before installing.
Mistake 2: Forcing the Electrical Connector
The connector tab is plastic and relatively thin. Prying it open with a screwdriver or using excessive force breaks the locking mechanism. Once broken, the connector slips off during operation.
Vibration causes intermittent contact. The DRL flashes or dies completely.
Prevention: Press the tab down with your thumb. Pull the connector straight off with steady, moderate force. If it resists, inspect for a secondary locking tab or retainer clip.
Release that first. Never lever the connector open.
Mistake 3: Damaging the Rubber Dust Boot
The dust boot seals the headlamp housing from the outside environment. Tears, cuts, or improper seating let in moisture, road salt spray, and fine particulate. Contaminants settle on the bulb glass and reflector surface.
Output degrades rapidly. Internal corrosion spreads to the socket and wiring.
Prevention: Inspect the boot before removal. Note any existing cracks or hardening. Clean the sealing surface thoroughly before reseating.
Press the boot evenly around the full circumference. Do not stretch it over sharp edges. Consider applying a thin coat of silicone dielectric grease to the boot interior to preserve the rubber and improve the seal.
Mistake 4: Cross-Threading or Stripping the Socket
The plastic housing receiving the bulb socket has delicate threads. Forcing the socket in at an angle strips those threads. A stripped socket spins freely and cannot lock.
The bulb falls out or makes poor electrical contact.
Prevention: Insert the socket straight. Start threading by hand before applying torque. If resistance occurs, back it out and realign.
Never use pliers to twist a socket into place. Hand-tight plus a quarter turn is sufficient.
Mistake 5: Skipping the Test Before Reassembly
Closing everything up without testing first is a classic error. If the new bulb does not work, you reopen everything. That doubles the labor and increases the chance of losing small clips or screws in the process.
Prevention: Test the DRL immediately after reconnecting the battery and before reinstalling any panels or covers. Confirm both sides illuminate at equal brightness. Check for flickering or dimming indicating a poor connection.
Only close up after verified function.
Mistake 6: Ignoring the Opposite Side
When one DRL bulb fails, the other rarely stays healthy long. Halogen DRL bulbs degrade gradually. The surviving bulb has accumulated similar runtime and heat cycles.
Replacing only one side often leads to a second failure within weeks or months.
Prevention: Replace both DRL bulbs simultaneously, even if the second one still lights. Matching age and output ensures consistent appearance. The extra $10 to $15 in bulb cost is minor compared to the inconvenience of a second repair job.
Costs, Legal Notes, and Long-Term Care
Understanding the true cost of this repair goes beyond the bulb price tag. Labor, legal requirements, and ongoing maintenance all factor into the real expense of keeping your DRLs functional.
Breaking Down the Real Cost
| Expense Category | DIY Cost | Professional Labor | Total |
|---|---|---|---|
| Halogen 9005 bulb (both sides) | $10–$30 | N/A | $10–$30 |
| LED 9005 replacement bulb (both sides) | $40–$120 | N/A | $40–$120 |
| Full LED headlamp assembly (one side) | $200–$600 | $50–$150 | $250–$750 |
| Sealed LED module (Overland/Summit, one side) | $150–$400 | $75–$200 | $225–$600 |
| Electrical contact cleaner | $5–$10 | N/A | $5–$10 |
| Silicone dielectric grease | $4–$8 | N/A | $4–$8 |
| Nitrile gloves (pack of 100) | $8–$15 | N/A | $8–$15 |
Your total DIY cost for a standard halogen replacement is likely $20 to $40 including supplies. A professional shop charges $50 to $150 in labor on top of parts. For most owners, the DIY savings are substantial.
Legal and Compliance Considerations
Daytime running lights serve a safety purpose recognized by federal motor vehicle standards. Under FMVSS 108, all vehicles sold in the United States after March 1989 must equip daytime running lights. A non-functional DRL on a 2013 Grand Cherokee means the vehicle does not meet the original certification standard.
State inspection requirements vary. Some states include DRL functionality in their annual safety inspection. Others do not check daytime lighting at all.
Check your local jurisdiction before assuming a burnt-out DRL passes unnoticed.
Aftermarket LED bulb upgrades introduce additional legal complexity. The Department of Transportation and the National Highway Traffic Safety Administration regulate automotive lighting equipment. LEDs with color temperatures above 6,000K produce a blue-white light failing beam pattern or color standards.
Several states explicitly ban LEDs above 6,000K for road use.
SAE International sets voluntary standards for automotive lighting under standards like J584 for bulb specifications and J1317 for headlamp photometric performance. While SAE standards are not federal law, they represent industry consensus on safe lighting performance. Products bearing the SAE approval mark undergo independent verification.
For authoritative information on vehicle lighting standards, FMVSS 108 provides the full regulatory text governing lamps, reflective devices, and associated equipment.
Maintaining DRL Function Over Time
Proper maintenance extends the life of your replacement and prevents unexpected failures.
- Monthly visual check: Walk around the vehicle with the ignition ON. Confirm both DRLs illuminate equally. Note any dimming or delay in startup.
- Seasonal boot inspection: Every season change, open the hood and inspect the rubber dust boot for cracks, tears, or loss of adhesion to the housing. Replace damaged boots immediately.
- Lens cleaning: Road grime, bug residue, and oxidation reduce light output significantly. Clean the headlamp lenses with a dedicated automotive headlight cleaner or a mild automotive polish. Apply regularly during spring and summer when bug and pollen exposure peaks.
- Connector inspection: During each bulb replacement, check the electrical connector for corrosion or melted plastic. Clean contacts with electrical contact cleaner. Replace connectors showing heat damage.
- Dual-side replacement habit: Always replace both DRL bulbs at the same time, regardless of which side failed first. Matching age and output ensures consistent appearance and reduces the chance of a second failure soon after your first repair. This practice aligns with the general maintenance discipline you apply when working on other vehicle systems, similar to rotating tires and checking tire pressure on schedule.
- Condensation monitoring: Inspect the interior of the headlamp lens periodically. Minor fogging after rain is normal and clears as the lamp warms. Persistent moisture or standing water inside the housing indicates a failed seal requiring immediate attention. Seal failure also impacts interior climate control and moisture management, so address any water intrusion issues promptly.
Visual Guide: Reading Your Headlamp Assembly Differentiation
Understanding what sits inside your headlamp housing prevents costly mistakes before you buy anything. The physical differences between trim-level lighting systems are subtle but critical. Learning to identify them by sight saves you from ordering the wrong replacement part.
Examining the Halogen Socket Configuration
A halogen-equipped headlamp shows a distinct circular opening at the rear of the assembly. The rubber dust boot covers this opening when installed. Remove the boot to see the socket protruding from the housing.
The socket is a black plastic cylinder approximately 1.5 inches in diameter. It has two metal prongs extending from its base for electrical connection. The socket body features ridges or a flanged collar locking into the housing when twisted clockwise.
Look through the front of the headlamp while someone activates the DRL circuit. You see a clear glass bulb with a visible tungsten filament inside. The bulb emits a warm yellow-white light around 3,200 Kelvin.
The filament glows brightly against the dark interior of the reflector housing.
Identifying the Sealed LED Module Layout
Sealed LED modules look completely different from the inside. Instead of a circular bulb opening, you see a flat rectangular circuit board mounted behind a diffuser lens. The board contains multiple small LED chips arranged in a linear or clustered pattern.
The module connects via a multi-pin wiring harness rather than simple two-prong contacts. The connector is typically a gray or black plastic block with six to eight terminals. It snaps into a receptacle on the back of the headlamp assembly.
There is no removable bulb. There is no socket to twist. The entire module either bolts to the housing or bonds permanently during manufacturing.
Removal requires unscrewing mounting bolts or cutting adhesive tape depending on the specific assembly design.
Side-by-Side Physical Comparison
| Feature | Halogen DRL Setup | Sealed LED DRL Setup |
|---|---|---|
| Socket type | Rotating twist-lock socket | Fixed multi-pin harness connector |
| Bulb visibility | Glass envelope with visible filament | Flat PCB with surface-mount LEDs |
| Dust boot presence | Large circular rubber boot | Usually none; sealed housing design |
| Mounting method | Quarter-turn twist lock | Bolted bracket or adhesive tape |
| Wiring connector | Two-prong tab-style plug | Six-to-eight pin rectangular connector |
| Heat dissipation | Heatsink integrated into bulb base | Aluminum board with finned heatsink |
| Serviceability | Bulb-only replacement | Module or full assembly replacement |
Using Visual References Before Purchasing
Take clear photos of your current headlamp setup before ordering replacements. Photograph the socket area, the connector type, and any part numbers visible on existing components. Cross-reference these images with product listings from reputable manufacturers.
When shopping online, filter results by your exact vehicle trim and year. Verify the listing explicitly states compatibility with your specific headlamp configuration. Many third-party sellers lump all 2011-to-2017 Grand Cherokees together regardless of lighting package differences.
If possible, remove your current bulb or module and compare it directly to product photographs. Check prong spacing, overall length, and base diameter measurements against the seller’s specifications. Even a quarter-inch difference prevents proper installation.
Troubleshooting Workflow: When Replacement Isn’t Enough
Sometimes a dead DRL indicates something other than a burned-out bulb. Following a systematic diagnostic process prevents unnecessary parts purchases and identifies root causes accurately. Use this decision tree when your replacement fails to illuminate.
Step A: Verify Power Reaches the Socket
Turn the ignition ON and use a multimeter set to DC volts. Probe the two metal contacts inside the socket simultaneously. You read approximately 12 volts.
No voltage indicates an upstream problem.
Low voltage readings between 9 and 11 volts suggest a weak battery, corroded grounds, or high resistance in the wiring. Start by cleaning the battery terminals and checking the chassis ground straps. Corroded grounds cause dim or intermittent lighting failures in vehicles over ten years old.
Step B: Check for Blown Fuses
Locate the under-hood fuse box near the battery. Open the cover and reference the diagram printed on the underside. Find the fuse labeled for daytime running lamps or headlamp circuits.
Pull the fuse and inspect the metal strip inside. A broken strip means blown fuse.
Replace with an identical amperage fuse. If the new fuse blows immediately, you have a short circuit in the wiring harness. Do not replace with a higher-amperage fuse.
That creates a fire hazard and likely damages the lighting control module.
Step C: Test the Relay Function
Some Grand Cherokee models route DRL power through a relay rather than direct fused circuits. Locate the relay in the fuse box matching the diagram label. Swap it with an identical relay from another circuit like horn or headlights.
If the DRL starts working after the swap, replace the faulty relay.
Relay failure symptoms include clicking sounds from the fuse box, intermittent operation, or complete darkness on one side only. Relays cost between $5 and $15 and are straightforward replacements.
Step D: Inspect Wiring and Connectors
Trace the wiring harness from the fuse box to the headlamp connector. Look for chafed insulation, rodent damage, or melted wires near hot engine components. Pay special attention where the harness passes through metal grommets or near sharp edges.
Disconnect the headlamp main connector and inspect terminal pins for green corrosion or burn marks. Clean contacts with electrical contact cleaner. Straighten bent pins carefully with needle-nose pliers.
Replace connectors showing heat damage or melted plastic.
Decision Flow Summary
- Voltage present at socket but bulb dark → Bad bulb or poor ground
- No voltage at socket → Check fuse first
- Fuse good, relay suspect → Swap relay and test
- Intermittent operation → Focus on wiring and connector integrity
- Both sides failed simultaneously → Suspect lighting control module or PCM issue
Decision Tree: Choosing Between Bulb, Module, or Assembly Replacement
Your repair path depends entirely on your trim level, current component condition, and budget priorities. This decision framework helps you select the right solution without guessing.
When to Replace Just the Bulb
Choose bulb-only replacement when your headlamp is halogen-equipped and the housing shows no damage. This applies to Base, Limited, and Trailhawk trims with functional dust boots and clean internal reflectors. Budget constraints favor this option since bulbs cost $5 to $15 each.
Bulb replacement works well when the failure is isolated to a single dim or dark lamp. It serves routine maintenance every 1,000 to 2,000 hours of operation. Choose this path if you plan to keep the vehicle several more years and want predictable maintenance intervals.
When to Replace the LED Module Only
Module-only replacement makes sense for Overland and Summit owners whose sealed LED unit failed while the rest of the headlamp remains functional. This applies when the housing lens shows minimal oxidation and the internal reflector surfaces remain clean and reflective.
Consider module replacement when the wiring harness and connector are intact. Verify the failure limits to the LED board itself and not caused by moisture intrusion or electrical surge damage. Module costs range from $150 to $400 depending on source.
This option suits owners wanting restored functionality without full assembly expense. It preserves the original factory match for paint and finish. However, module installation proves tricky due to adhesive tapes and tight clearance constraints.
When Full Assembly Replacement Wins
Full assembly replacement is the right choice when your current headlamp shows significant interior condensation, cracked lenses, or degraded reflectors. It makes sense when the housing mounting points are damaged or corroded. This path also works when upgrading to LED technology across both sides simultaneously.
Assembly replacement shines when you want guaranteed fitment and optimal beam pattern performance. Aftermarket assemblies offer projector-style optics outperforming stock reflector designs. Full units cost $200 to $600 per side but eliminate guesswork about component compatibility.
Choose this route when time matters more than parts cost. A direct bolt-on assembly saves hours of fiddling with modules, adapters, and wiring splices. It also provides warranty coverage individual components may lack.
| Your Situation | Recommended Path | Estimated Cost | Expected Outcome |
|---|---|---|---|
| Halogen trim, single bulb failure | Bulb replacement | $10–$30 | Restored function, same lifespan |
| Halogen trim, both sides aging | Dual bulb upgrade to LED | $40–$120 | Brighter light, longer life |
| Overland/Summit, module failure only | LED module replacement | $150–$400 | Factory-look restoration |
| Any trim, damaged housing or severe oxidation | Full LED assembly | $200–$600 per side | Maximum performance and appearance |
| Both sides failed, want premium upgrade | Dual full LED assemblies | $400–$1,200 total | Best-in-class illumination |
When to Call a Professional Installer
Most DRL replacements fit comfortably within DIY capability. Certain conditions push this repair toward professional service. Recognizing those thresholds prevents injury, component damage, and warranty complications.
Situations Requiring Shop Attention
Professional installation becomes necessary when your Grand Cherokee uses sealed LED modules and you lack experience removing headlamp assemblies. The process involves disconnecting multiple electrical connectors, unbolting mounting brackets, and sometimes partially removing bumper components for access. Without familiarity, you risk breaking clips or damaging surrounding panels.
Seek professional help when diagnostics reveal wiring shorts or control module failures. Internal electrical problems require oscilloscope testing and schematic reading beyond basic multimeter diagnostics. A qualified technician traces faults through the CAN bus network efficiently.
Call a shop when local regulations require certified installation for lighting modifications. Some states mandate professional installation of aftermarket LED conversions ensuring compliance with beam pattern standards. Receipts from licensed installers satisfy inspection requirements.
DIY Limitations to Respect
Do not attempt this repair if you cannot work comfortably in confined engine bay spaces. The driver-side headlamp area packs dense components including the air intake, radiator support, and various fluid reservoirs. Limited visibility and awkward positioning increase error risk.
Avoid DIY installation if your vehicle has experienced prior collision damage near the front end. Bent mounting points or misaligned panels interfere with new assembly fitment. A professional body shop corrects alignment issues before lighting installation.
Refrain from proceeding if you lack basic hand tool proficiency. Stripped Torx screws, broken plastic retainers, and crushed wiring harnesses result from unfamiliarity with automotive fastener types. Invest time learning tool usage before attempting complex disassembly sequences.
Finding the Right Technician
Look for independent repair shops specializing in Jeeps or Mopar vehicles. These technicians understand WK2-specific quirks and have access to OEM procedures. Dealership service departments possess factory training but charge premium labor rates averaging $125 to $200 per hour.
Verify credentials before handing over keys. Ask about warranty coverage on both parts and labor. Reputable shops stand behind their work for at least 12 months or 12,000 miles.
Get written estimates detailing labor time expectations and parts markups before authorization.
Compare quotes from at least three sources when costs exceed $300. Be wary of shops quoting significantly below market rate. Deep discounts often indicate inexperienced technicians or refurbished components carrying hidden failure risk.
Expert Tips and Pro Techniques for WK2 Owners
Certain insights only come from repeated experience with the WK2 platform. These tips separate rushed repairs from clean, professional-quality work lasting years.
Using Dielectric Grease Strategically
Apply a pea-sized amount of dielectric grease to the bulb socket terminals before insertion. The grease repels moisture and prevents corrosion on the metal contact pins. It also makes future removal easier since the socket does not fuse to the housing over time.
Do not apply grease inside the rubber dust boot sealing surface. Grease there compromises the waterproof seal and invites condensation into the headlamp interior. Keep lubricant strictly on electrical contacts where it belongs.
Managing Tight Engine Bay Space
The driver-side engine compartment packs dense components. The air intake duct, coolant reservoir, and brake fluid booster all compete for access. Rotate the steering wheel fully to the right before starting.
This swings the driver-side front tire away and opens a small but critical gap.
Use a flexible magnet tool to retrieve dropped Torx screws. They roll into impossible places behind the radiator support. A simple magnet on a flexible shaft saves twenty minutes of flashlight-wielding frustration.
Diagnosing Intermittent DRL Failure
When your DRL flickers randomly, the problem is rarely the bulb itself. Trace the circuit systematically. Check battery voltage with the engine running.
Healthy charging systems hold steady between 13.8 and 14.4 volts. Fluctuations indicate alternator issues affecting all lighting circuits.
Inspect the chassis ground point near the driver-side strut tower. Clean any corrosion from the grounding surface with sandpaper. A poor ground creates voltage drop mimicking bulb failure symptoms.
Wiggling the harness near connectors while testing reveals intermittent breaks in the wiring.
Preserving the Rubber Boot During Removal
Rubber boots crack with age and heat exposure. Grip the boot evenly around its circumference rather than pulling from one side. Rolling the boot off the housing maintains its shape better than stretching it unevenly.
If the boot shows existing cracks along the sealing lip, replace it immediately. A compromised boot costs nothing to fix proactively but guarantees interior contamination within months. Mopar part number 55014884AA covers the dust boot assembly for most WK2 applications.
Real-World Scenario Breakdowns
Concrete examples clarify abstract advice. These documented scenarios show how different failures play out and what solutions actually work.
Scenario 1: The 47,000-Mile Halogen Burnout
A Limited trim owner reported complete DRL failure on the driver side after 47,000 miles. Visual inspection confirmed the 9005 bulb had a darkened glass envelope and broken filament. Multimeter testing showed 12.1 volts at the socket with good ground continuity.
The replacement involved standard bulb swap procedure. However, the technician noted heavy black deposits inside the housing around the socket area. Those deposits indicated previous overheating from a loose connection.
Cleaning the socket contact with electrical contact cleaner prevented recurrence. The owner kept the old bulb for comparison and confirmed the failure matched typical halogen end-of-life patterns.
Scenario 2: LED Module Failure on Summit After Snow Storms
A Summit owner experienced total DRL loss after three consecutive winter seasons of salt exposure. The sealed LED module showed visible water intrusion inside the housing. Corrosion covered the multi-pin connector terminals.
Module replacement required partial bumper removal for access. The new OEM LED assembly included updated sealing gaskets addressing the original design vulnerability. Post-installation testing showed equal brightness on both sides within 30 seconds of ignition.
The owner received a 24-month warranty on the assembly, covering potential future seal failures.
Scenario 3: Aftermarket LED Causing Dashboard Warnings
An owner installed cheap $25 LED 9005 bulbs without canbus drivers. The dashboard displayed a lighting fault warning immediately. The DRLs functioned but flashed rapidly due to the system detecting lower current draw.
Installing resistor modules between the bulbs and sockets resolved the issue. The resistors added enough load to mimic halogen draw characteristics. Total cost rose to $65 including resistors and installation time.
The owner learned to verify canbus compatibility before purchasing LED upgrades.
Scenario 4: Intermittent Failure From Vibration
A Base model owner reported DRLs working perfectly until hitting bumps. Diagnosis revealed the bulb socket had loosened slightly from vibration over two years. The quarter-turn lock hadn’t fully engaged during the previous replacement.
Retrieving the socket showed minor scoring on the plastic locking ridges. The owner replaced the socket with an OEM unit and ensured proper clockwise engagement during reassembly. Adding a small bead of threadlocker to the socket threads prevented future loosening without affecting serviceability.
Seasonal Maintenance Calendar for DRL Systems
Structured maintenance prevents surprises. Aligning inspections with seasonal changes catches problems before they strand you.
| Season | Inspection Focus | Action Items |
|---|---|---|
| Spring | Lens clarity and seal integrity | Clean headlamp exteriors, check for oxidation, inspect dust boots for UV cracking |
| Summer | Heat-related wear | Verify proper socket seating, check for melted connector plastic, test operation during longest daylight hours |
| Fall | Moisture preparation | Apply dielectric grease to contacts, confirm dust boot seals are tight, test before winter storms |
| Winter | Cold-weather function | Monitor for delayed illumination, watch for condensation after rain or car washes, verify both sides equally bright |
Spring cleaning matters most for optical performance. Road salt residue and pollen build-up reduce light output by up to 30 percent over time. Use automotive headlight restoration kits on oxidized lenses.
Clear optics ensure maximum visibility from your DRLs.
Fall preparation protects against winter moisture intrusion. Temperature swings between warm garages and cold outdoor parking create condensation cycles. Properly sealed housings resist this process.
Replace any brittle or cracked dust boots before freezing temperatures arrive.
Winter monitoring catches degradation early. Cold weather thickens electrical resistance in aging connectors. If one DRL takes longer to illuminate than the other, investigate connector integrity rather than assuming bulb failure.
Advanced Electrical Diagnostics for Persistent Issues
Standard troubleshooting misses subtle problems. These deeper diagnostic techniques address cases where simple bulb replacement fails.
Reading Current Draw Patterns
Connect an ammeter in series with the DRL circuit while the system operates. Normal 9005 halogen draw measures approximately 5.4 amps per side at 12 volts. LED modules draw 1.5 to 2.5 amps depending on configuration.
Deviant readings reveal hidden problems. Higher than normal amperage indicates decreased resistance from moisture contamination or partial shorting. Lower than normal draw points to corroded contacts increasing circuit resistance.
Both conditions accelerate component failure if unaddressed.
Testing the Lighting Control Module Output
Some WK2 models route DRL commands through the body control module rather than direct switches. Scan for active diagnostic trouble codes using an OBD2 scanner capable of reading BCM communication protocols. Codes like B1234 or U-series network errors indicate module-level faults.
Measure output voltage at the DRL control signal wire with ignition ON. A steady 5-volt reference signal confirms the module sends commands correctly. Absence of signal suggests internal module failure requiring professional programming or replacement.
Checking Ground Circuit Integrity
Ground path problems cause 40 percent of lighting failures technicians misdiagnose as bulb issues. Measure voltage drop between the bulb socket ground terminal and the battery negative post with the circuit active. Acceptable drop reads below 0.1 volts.
Anything above 0.3 volts indicates ground path resistance needing correction.
Clean the primary ground point at the front crossmember near the radiator support. Remove any paint or corrosion from the contact surface. Torque the ground bolt to specification ensuring metal-to-metal contact rather than compressed paint layers.
FAQs About How to Replace Daytime Running Lights
Can I use regular headlight bulbs for my DRLs?
No. DRLs run continuously and generate more heat cycle stress. Use bulbs rated for DRL duty, typically labeled “DRL” or “daytime running light” on the package.
Why did my new halogen bulb burn out in two weeks?
Most likely you touched the glass during installation. Skin oils create hot spots shortening bulb life dramatically. Always handle with a cloth.
Do I need to replace both DRLs at the same time?
Not required, but highly recommended. If one failed, the other is probably near end-of-life too. Matching age prevents uneven appearance.
My Overland has sealed LEDs. Can I still upgrade to brighter LEDs?
Yes, but you need to replace the entire headlamp assembly or the LED module itself. Aftermarket 9005 bulbs do not fit.
Will LED bulbs trigger a dashboard error?
Sometimes. Lower-power LED bulbs trick the canbus system into thinking a bulb is failed. Solutions include adding resistors or buying canbus-compatible LEDs.
Can I replace just one DRL bulb or should I replace both?
Replace both bulbs whenever one fails. DRL bulbs age together under identical conditions. A new bulb on one side and an old one on the other creates visible brightness mismatch and risks a second failure within weeks.
Pair replacement costs only $10 to $15 more and provides consistent appearance and reliability.
Why does my new halogen bulb fail after only a few days?
The most likely cause is skin oil contamination on the glass. Even a brief fingerprint transfers enough oil to create a thermal weak spot. Under sustained 65-watt operation, that spot fails first.
Another possibility is an incorrect wattage bulb or a failing ballast or relay in the DRL circuit. Verify the replacement bulb matches the OEM specification exactly.
My Overland trim has sealed LEDs. Can I still swap to brighter LED bulbs?
No. The sealed LED module is a fixed assembly. There is no bulb socket to access.
Your options are to replace the LED module itself or install a complete aftermarket LED headlamp assembly. LED 9005 replacement bulbs are designed only for halogen socket applications and will not fit a sealed LED housing.
Are aftermarket LED bulbs safe for my Grand Cherokee’s wiring?
Quality LED bulbs drawing equal or lower wattage than OEM halogens pose no wiring risk. Cheap LED clones draw excessive current or produce voltage spikes damaging sensitive vehicle electronics. Select LEDs with ECE or SAE certification markings and built-in canbus drivers.
Avoid non-branded products from unknown manufacturers lacking specification transparency.
Should I replace headlamp bulbs in pairs even if only one failed?
Yes. DRL bulbs degrade gradually under constant thermal cycling. The surviving bulb accumulates nearly identical runtime and stress exposure.
Replacing only one side guarantees mismatched brightness within months. Pair replacement maintains consistent appearance and reduces future repair frequency. This approach mirrors best practices for maintaining other vehicle lighting systems where simultaneous failure risk remains high.
Final Verdict: Which DRL Repair Path Fits Your Situation
Your optimal repair choice depends on trim level, budget, and how long you plan keeping the vehicle. This verdict synthesizes every factor covered throughout this guide into actionable recommendations.
For Base and Limited Owners With Halogen Systems
Replace OEM-spec 9005 halogen bulbs every 12 to 18 months as preventive maintenance. Budget $20 to $40 annually for dual-bulb replacement including supplies. This approach delivers predictable performance without complex installations.
Consider LED 9005 upgrades only if your local climate demands brighter forward illumination or you tolerate potential canbus warnings. Select brands with documented beam pattern optimization for halogen reflector housings. Avoid ultra-cheap imports lacking photometric testing data.
For Overland and Summit Owners With Sealed LEDs
Monitor module functionality monthly during winter months. Replace failing modules promptly before moisture damage spreads to adjacent wiring. Keep spare OEM modules on hand if you frequently tow or drive on rough roads where vibration stress accelerates LED board fatigue.
Full assembly upgrades make financial sense when housing condition declines or you desire projector-style beam patterns. Factor in professional installation costs when comparing against individual module replacement expenses.
Universal Recommendations Applying to All Trims
Always replace both DRL components simultaneously regardless of which side initially failed. Matching age and output prevents visual imbalance and reduces repeat service calls. Maintain clean dust boot seals above all else.
A properly sealed housing extends bulb life by 50 percent or more compared to compromised seals.
Invest in quality replacement parts from recognized manufacturers. Cheap alternatives save money upfront but fail prematurely, costing more in repeated labor and potential vehicle damage. The $10 difference between economy and premium 9005 bulbs pays for itself within a single replacement cycle.
This repair stays firmly in DIY territory for halogen-equipped models. Sealed LED systems require more specialized knowledge but remain manageable with careful preparation. Either way, proper execution restores visibility safety and keeps your 2013 Grand Cherokee roadworthy for years ahead.
“Cars aren’t just machines. They’re freedom, memory, and a little bit of grease under your fingernails.”
I’m Theodore Roosevelt—though my friends just call me “Ted” (and no, I’m not related to the president, though I do share his love for adventure). I grew up in Detroit in the 1970s, back when the city was still the heart of the American auto industry. My first love was a rusted-out 1967 Mustang my father and I rebuilt in our garage when I was fifteen. That project taught me that cars have souls. After spending twenty years as a mechanic and another ten writing for magazines, I started this blog to help everyday drivers and weekend wrenchers feel confident under the hood. Whether you’re restoring a classic or just trying to keep your daily driver alive for one more winter, I’m here to help you get there.