The Jeep Wrangler JL is a master of off-road adventure, but its true versatility shines when you can bring your gear, toys, or trailer along for the ride. Whether you need to haul a small camper, a utility trailer, or a pair of dirt bikes, installing a tow hitch on your JL is the first step toward unlocking its full potential as a capable tow vehicle. While the idea of wiring and bolting a hitch to your Jeep might seem daunting, the process is surprisingly straightforward and can be completed in a single afternoon with basic hand tools.
This guide will walk you through the entire process of installing a tow hitch on your Jeep Wrangler JL, from selecting the right components to wiring the electrical connector. We will cover the specific steps for both the standard rear bumper and the steel bumper group, ensuring you have a safe and reliable towing setup. By the end of this article, you will have the confidence to perform this yourself, saving money on installation and gaining a understanding of your vehicle’s capabilities.
Choosing The Right Tow Hitch And Components For Your JL
Key Takeaways
- ✓ Choose a Class III 2-inch receiver hitch rated for your JL’s 3,500-pound towing capacity, ensuring it is compatible with your bumper type (standard or steel).
- ✓ Gather all necessary tools beforehand, including a torque wrench, socket set, and jack stands, and always disconnect the battery for safety.
- ✓ The hitch bolts directly to the frame rails; for standard bumpers, you only need to pull the back, not fully remove it.
- ✓ a vehicle-specific T-connector wiring harness for a simple, no-splice plug-and-play installation that maintains factory electrical integrity.
- ✓ Always test all trailer lights after installation and adhere to safe towing practices, including respecting weight limits and proper tongue weight distribution.
Frequently Asked Questions
Can I install a tow hitch on a Jeep Wrangler with the factory steel bumper?
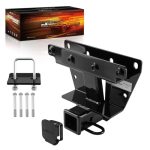
Yes, absolutely. You will need a hitch specifically designed for the steel bumper group, such as the Mopar 82215183AB. This hitch integrates with the factory tow hook brackets. You will need to remove the tow hooks, install the hitch, and then reinstall the tow hooks on top of the hitch brackets. The process similar to the standard bumper install.
Do I need to drill any holes in my Jeep’s frame to install the hitch?
No. All quality aftermarket and OEM hitches for the Jeep Wrangler JL are bolt directly into existing threaded holes in the frame rails. No drilling, cutting, welding is required. This makes the installation completely reversible and does not compromise the structural integrity of your vehicle.
What is the difference between a Class II and Class III hitch for my JL?
A Class II hitch typically has a 1.25-inch receiver and for up to 3,500 pounds. A Class III hitch has a 2-inch receiver and is also rated for up to 3,500 pounds on the JL. Class III is the better choice because the 2-inch receiver is the industry standard for most trailers, bike racks, and cargo carriers, offering more versatility and stability.
How long does a typical Jeep Wrangler JL tow hitch installation take?
For a first-time installer with basic mechanical skills, the entire process, including the wiring, should take between 2 and 4 hours. If you have experience and the right tools, you can complete it in under 2 hours. The wiring portion is the most time-consuming part, but the plug-and-play harnesses make it much faster than older splicing methods.
Will installing a tow hitch void my Jeep’s warranty?
No, installing an aftermarket tow hitch will not void your vehicle’s warranty. The Magnuson-Moss Warranty Act protects consumers from having their warranty voided simply for using an aftermarket part. However, if the hitch installation causes damage to another component (e.g., you strip a bolt or damage a wire), that specific repair may not be covered. Using a quality hitch and following the instructions carefully will prevent any issues.
Conclusion
Installing a tow hitch on your Jeep Wrangler JL is a rewarding and practical upgrade that dramatically expands your vehicle’s utility. By following the steps outlined in this guide, you have learned how to select the correct hitch, safely prepare your vehicle, bolt the hitch into place, and wire the trailer connector without any complicated electrical work. This project is a perfect example of a DIY task that saves you money while giving you a deeper connection to your Jeep.
Now that your JL is equipped for to, the possibilities are endless. Whether you are planning a weekend camping trip, moving a trailer full of landscaping materials, or simply adding a bike rack, your Jeep is ready. Take the time to double-check your work, test your lights, and tow within your vehicle’s limits. Enjoy the newfound capability of your Wrangler, and hit the road with confidence knowing you did the job right.

“Cars aren’t just machines. They’re freedom, memory, and a little bit of grease under your fingernails.”
I’m Theodore Roosevelt—though my friends just call me “Ted” (and no, I’m not related to the president, though I do share his love for adventure). I grew up in Detroit in the 1970s, back when the city was still the heart of the American auto industry. My first love was a rusted-out 1967 Mustang my father and I rebuilt in our garage when I was fifteen. That project taught me that cars have souls. After spending twenty years as a mechanic and another ten writing for magazines, I started this blog to help everyday drivers and weekend wrenchers feel confident under the hood. Whether you’re restoring a classic or just trying to keep your daily driver alive for one more winter, I’m here to help you get there.